概诉
本文会对java JUC 下的并发包做一个统一的讲解,针对于源码分析环境,需要取查看博主的另外一个系列——多线程 ,这里对细节不在深入。
Semaphore 信号量是一类经典的同步工具。信号量通常用来限制线程可以同时访问的(物理或逻辑)资源数量。
CountDownLatch 一种非常简单、但很常用的同步辅助类。其作用是在完成一组正在其他线程中执行的操作之前,允许一个或多个线程一直阻塞。
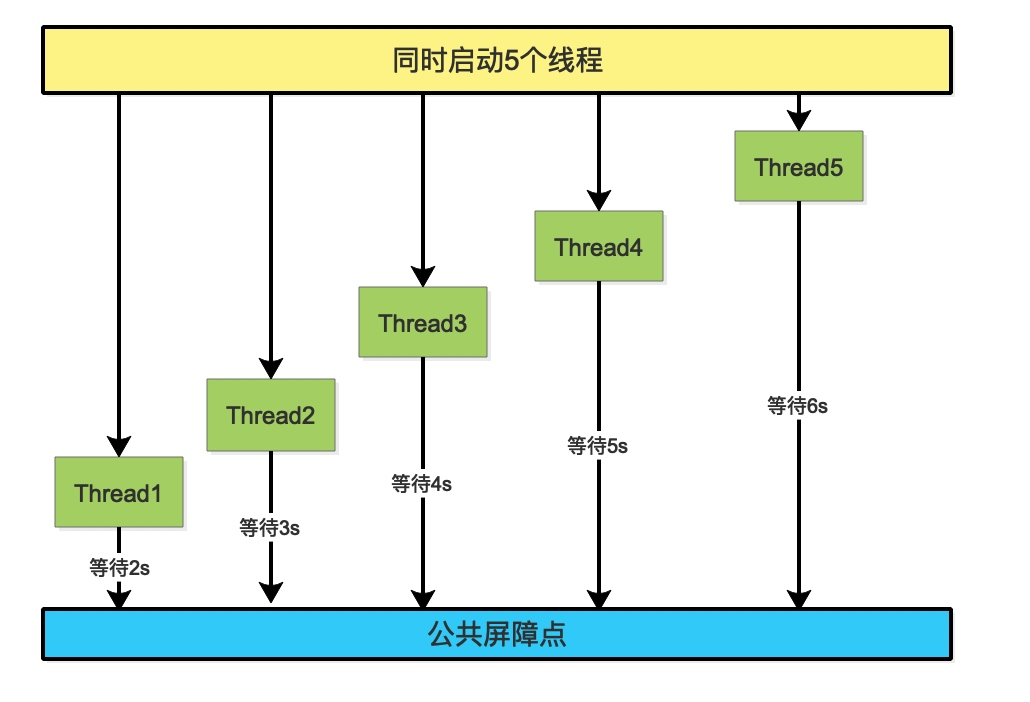
CyclicBarrier 一种可重置的多路同步点,在某些并发编程场景很有用。它允许一组线程互相等待,直到到达某个公共的屏障点 (common barrier point)。在涉及一组固定大小的线程的程序中,这些线程必须不时地互相等待,此时 CyclicBarrier 很有用。因为该 barrier在释放等待线程后可以重用,所以称它为循环的barrier。
Phaser 一种可重用的同步屏障,功能上类似于CyclicBarrier和CountDownLatch,但使用上更为灵活。非常适用于在多线程环境下同步协调分阶段计算任务(Fork/Join框架中的子任务之间需同步时,优先使用Phaser)
Exchanger 允许两个线程在某个汇合点交换对象,在某些管道设计时比较有用。Exchanger提供了一个同步点,在这个同步点,一对线程可以交换数据。每个线程通过exchange()方法的入口提供数据给他的伙伴线程,并接收他的伙伴线程提供的数据并返回。当两个线程通过Exchanger交换了对象,这个交换对于两个线程来说都是安全的。Exchanger可以认为是 SynchronousQueue 的双向形式,在运用到遗传算法和管道设计的应用中比较有用。
详解
CountDownLatch
功能
等待多线程完成的的同步工具,其作用是在完成一组正在其他线程中执行的操作之前,允许一个或多个线程一直阻塞,在AQS的相关博文中有详细的分析。JAVA多线程之AQS分析(2)CountDownLatch的分析来解读AQS的共享功能
举例
启动10个线程,当10个线程都执行完毕之后才能继续执行。
1 2 3 4 5 6 7 8 9 10 11 12 13 14 15 16 17 18 19 20 21 22 23 24 private static void countDownLatch () { Thread[] threads = new Thread [10 ]; CountDownLatch latch = new CountDownLatch (threads.length); for (int i=0 ; i<threads.length; i++) { threads[i] = new Thread (()->{ int result = 0 ; for (int j=0 ; j<10 ; j++) result += j; latch.countDown(); System.out.println(Thread.currentThread().getName() + ":finsh result:" + result); }); threads[i].start(); } try { latch.await(); } catch (InterruptedException e) { e.printStackTrace(); } System.out.println("end latch" ); }
详解
CountDownLatch的核心 其实就两个方法:await和countDown,我们先来看CountDownLatch的构造方法。
构造方法
1 2 3 4 5 6 7 8 9 10 11 12 13 14 15 16 17 18 19 20 21 22 23 24 private static final class Sync extends AbstractQueuedSynchronizer { protected int tryAcquireShared (int acquires) { return (getState() == 0 ) ? 1 : -1 ; } protected boolean tryReleaseShared (int releases) { for (;;) { int c = getState(); if (c == 0 ) return false ; int nextc = c-1 ; if (compareAndSetState(c, nextc)) return nextc == 0 ; } } } private final Sync sync; public CountDownLatch (int count) { if (count < 0 ) throw new IllegalArgumentException ("count < 0" ); this .sync = new Sync (count); }
从构造方法中我们看到,CountDownLatch 也是AQS的应用之一,里面的sync变量就是CountDownLatch核心组件了。CountDownLatch 中的核心方法均是围绕着Sync(AQS)组件进行的。
await 方法
CountDownLatch的await方法的作用是使得线程阻塞,当然,阻塞是有条件的。只有Sync的值为0的时候,才会唤醒。
1 2 3 4 5 6 7 8 9 10 11 12 13 14 public void await () throws InterruptedException { sync.acquireSharedInterruptibly(1 ); } public final void acquireSharedInterruptibly (int arg) throws InterruptedException { if (Thread.interrupted()) throw new InterruptedException (); if (tryAcquireShared(arg) < 0 ) doAcquireSharedInterruptibly(arg); }
countDown 方法
释放锁,本质是stats - 1 先去释放,如果释放成功,去唤醒所有的共享锁
1 2 3 4 5 6 7 8 9 10 11 12 13 public void countDown () { sync.releaseShared(1 ); } public final boolean releaseShared (int arg) { if (tryReleaseShared(arg)) { doReleaseShared(); return true ; } return false ; }
CyclicBarrier
功能
一种可重置的多路同步点,在某些并发编程场景很有用。它允许一组线程互相等待,直到到达某个公共的屏障点 (common barrier point)。在涉及一组固定大小的线程的程序中,这些线程必须不时地互相等待,此时 CyclicBarrier 很有用。因为该 barrier在释放等待线程后可以重用,所以称它为循环的barrier。
看下图:
举例
一下例子,表示只有所有的线程都执行完成之后,才能继续进行
1 2 3 4 5 6 7 8 9 10 11 12 13 14 15 16 17 18 19 20 21 22 23 private static void testTestCyclicBarrier () { Thread[] threads = new Thread [5 ]; CyclicBarrier barrier = new CyclicBarrier (threads.length, () -> { System.out.println("============ wake up all ============" ); }); for (int i = 0 ; i < threads.length; i++) { threads[i] = new Thread (()->{ String name = Thread.currentThread().getName(); long l = System.currentTimeMillis(); try { System.out.println(name + ": await" ); barrier.await(); } catch (InterruptedException | BrokenBarrierException e) { e.printStackTrace(); } System.out.println(name + ": wake up wait:" + (System.currentTimeMillis() - l)); }); threads[i].start(); } }
详解
构造函数
1 2 3 4 5 6 7 8 9 10 11 12 13 14 15 16 17 18 19 20 21 22 23 24 25 26 27 28 29 30 31 32 33 34 35 36 37 public class CyclicBarrier { private static class Generation { boolean broken = false ; } private final ReentrantLock lock = new ReentrantLock (); private final Condition trip = lock.newCondition(); private final int parties; private final Runnable barrierCommand; private Generation generation = new Generation (); private int count; public CyclicBarrier (int parties, Runnable barrierAction) { if (parties <= 0 ) throw new IllegalArgumentException (); this .parties = parties; this .count = parties; this .barrierCommand = barrierAction; } public CyclicBarrier (int parties) { this (parties, null ); } }
从CyclicBarrier的成员来看,它本质上是基于ReentrantLock独占锁实现,通过Lock和Condition的结合,在加上计数器来实现。它的核心方法是await()。
核心await 方法
1 2 3 4 5 6 7 8 9 10 11 12 13 14 15 16 17 18 19 20 21 22 23 24 25 26 27 28 29 30 31 32 33 34 35 36 37 38 39 40 41 42 43 44 45 46 47 48 49 50 51 52 53 54 55 56 57 58 59 60 61 62 63 64 65 66 67 68 69 70 71 72 73 74 75 76 77 78 79 80 81 private int dowait (boolean timed, long nanos) throws InterruptedException, BrokenBarrierException, TimeoutException { final ReentrantLock lock = this .lock; lock.lock(); try { final Generation g = generation; if (g.broken) throw new BrokenBarrierException (); if (Thread.interrupted()) { breakBarrier(); throw new InterruptedException (); } int index = --count; if (index == 0 ) { boolean ranAction = false ; try { final Runnable command = barrierCommand; if (command != null ) command.run(); ranAction = true ; nextGeneration(); return 0 ; } finally { if (!ranAction) breakBarrier(); } } for (;;) { try { if (!timed) trip.await(); else if (nanos > 0L ) nanos = trip.awaitNanos(nanos); } catch (InterruptedException ie) { if (g == generation && ! g.broken) { breakBarrier(); throw ie; } else { Thread.currentThread().interrupt(); } } if (g.broken) throw new BrokenBarrierException (); if (g != generation) return index; if (timed && nanos <= 0L ) { breakBarrier(); throw new TimeoutException (); } } } finally { lock.unlock(); } } private void nextGeneration () { trip.signalAll(); count = parties; generation = new Generation (); }
可以看到,核心的思想就是先判断当前执行的线程是否到达了最后一个屏障,如果到达最后一个屏障:“判断barrierCommand是否为空,不为空执行barrierCommand任务,接着执行nextGeneration方法。在nextGeneration方法中通过Condition的signalAll唤醒其它阻塞的线程开始继续执行。”
Semaphore
功能
Semaphore管理着一组许可(permit),许可的初始数量可以通过构造函数设定,操作时首先要获取到许可,才能进行操作,操作完成后需要释放许可。如果没有获取许可,则阻塞到有许可被释放。如果初始化了一个许可为1的Semaphore,那么就相当于一个不可重入的互斥锁
Semaphore当前在多线程环境下被扩放使用,操作系统的信号量是个很重要的概念,在进程控制方面都有应用。Java 并发库 的Semaphore 可以很轻松完成信号量控制,Semaphore可以控制某个资源可被同时访问的个数,通过 acquire() 获取一个许可,如果没有就等待,而 release() 释放一个许可。比如在Windows下可以设置共享文件的最大客户端访问个数。
举例
洗手间是有10个槽位,在同一时刻,只能为10个人提供该服务。Semaphore
1 2 3 4 5 6 7 8 9 10 11 12 13 14 15 16 17 18 19 20 21 22 23 24 25 26 27 28 29 30 31 32 33 34 35 36 37 38 39 private static void testSemaphore () throws InterruptedException { int solt = 10 ; Map<Integer, List<String>> washRoom= new HashMap <>(solt); for (int i = 0 ; i < solt; i++) { washRoom.put(i, new ArrayList <String>()); } Semaphore semaphore = new Semaphore (solt); Runnable r = () -> { try { semaphore.acquire(); int name = Integer.parseInt(Thread.currentThread().getName()); int index = name % 10 ; List<String> list = washRoom.get(index); list.add(name + "" ); TimeUnit.MILLISECONDS.sleep(100 ); } catch (InterruptedException e) { e.printStackTrace(); }finally { semaphore.release(); } }; Thread[] threads = new Thread [solt * 3 ]; for (int i = 0 ; i < threads.length; i++) { Thread thread = new Thread (r); thread.setName(i + "" ); threads[i] = thread; thread.start(); } for (Thread t : threads) { t.join(); } System.out.println(washRoom); }
详解
构造函数
1 2 3 4 5 6 7 public Semaphore (int permits ) { sync = new NonfairSync (permits ); } public Semaphore (int permits , boolean fair) { sync = fair ? new FairSync (permits ) : new NonfairSync (permits ); }
acquire
1 2 3 public void acquire () throws InterruptedException { sync.acquireSharedInterruptibly(1 ); }
release
1 2 3 public void release () { sync.releaseShared(1 ); }
我们看到 Semaphore 的本质是一个基于 AQS的共享锁的方法,这里不做具体的分析。
Phaser
功能
同步器
作用
CountDownLatch
倒数计数器,初始时设定计数器值,线程可以在计数器上等待,当计数器值归0后,所有等待的线程继续执行
CyclicBarrier
循环栅栏,初始时设定参与线程数,当线程到达栅栏后,会等待其它线程的到达,当到达栅栏的总数满足指定数后,所有等待的线程继续执行
Phaser
多阶段栅栏,可以在初始时设定参与线程数,也可以中途注册/注销参与者,当到达的参与者数量满足栅栏设定的数量后,会进行阶段升级(advance)
phase(阶段)
我们知道,在CyclicBarrier中,只有一个栅栏,线程在到达栅栏后会等待其它线程的到达。Phaser也有栅栏,在Phaser中,栅栏的名称叫做phase(阶段) ,在任意时间点,Phaser只处于某一个phase(阶段),初始阶段为0,最大达到Integerr.MAX_VALUE ,然后再次归零。当所有parties参与者都到达后,phase值会递增 。
parties(参与者)
parties(参与者)其实就是CyclicBarrier中的参与线程的概念。CyclicBarrier中的参与者在初始构造指定后就不能变更,而Phaser既可以在初始构造时指定参与者的数量,也可以中途通过register、bulkRegister、arriveAndDeregister等方法注册/注销参与者。
arrive(到达) / advance(进阶)
Phaser注册完parties(参与者)之后,参与者的初始状态是unarrived的,当参与者到达(arrive)当前阶段(phase)后,状态就会变成arrived。当阶段的到达参与者数满足条件后(注册的数量等于到达的数量),阶段就会发生进阶(advance)——也就是phase值+1。
举例
Example1
有时候我们希望所有线程到达指定点后再同时开始执行
1 2 3 4 5 6 7 8 9 10 11 12 13 14 15 16 17 18 19 20 21 22 23 24 25 26 27 28 29 30 public static void PhaserTestExample1 () throws InterruptedException { int solt = 3 ; Phaser phaser = new Phaser (); Thread[] threads = new Thread [solt]; Runnable r = () ->{ System.out.println(Thread.currentThread().getName() + ": 执行开始任务:" + phaser.getPhase()); int i = phaser.arriveAndAwaitAdvance(); System.out.println(Thread.currentThread().getName() + ": 执行完任务,当前phase:" + i + "=" + phaser.getPhase()); }; for (int i = 0 ; i < solt; i++) { phaser.register(); } for (int i = 0 ; i < solt; i++) { threads[i] = new Thread (r); threads[i].setName("PhaserTestExample1-" + i); threads[i].start(); } for (Thread t : threads) { t.join(); } int registeredParties = phaser.getRegisteredParties(); int arrivedParties = phaser.getArrivedParties(); System.out.println("registeredParties:" + registeredParties); System.out.println("arrivedParties:" + arrivedParties); }
输出如下:
1 2 3 4 5 6 7 8 PhaserTestExample1-0: 执行开始任务:0 PhaserTestExample1-1: 执行开始任务:0 PhaserTestExample1-2: 执行开始任务:0 PhaserTestExample1-2: 执行完任务,当前phase:1=1 PhaserTestExample1-1: 执行完任务,当前phase:1=1 PhaserTestExample1-0: 执行完任务,当前phase:1=1 registeredParties:3 arrivedParties:0
以上示例中,创建了3个线程,并通过 register 或者 bulkRegister,方法注册Phaser的参与者数量为3。当某个线程调用arriveAndAwaitAdvance 方法后,arrive 数量会加1,如果数量没有满足总数(参与者数量3),当前线程就是一直等待,当最后一个线程到达后,phase(阶段) 会 + 1, 然后所有线程都会继续往下执行。
注意:arriveAndAwaitAdvance 方法是不响应中断的,也就是说即使当前线程被中断,arriveAndAwaitAdvance方法也不会返回或抛出异常,而是继续等待。如果希望能够响应中断,可以参考awaitAdvanceInterruptibly方法。
Example2
1 2 3 4 5 6 7 8 9 10 11 12 13 14 15 16 17 18 19 20 21 22 23 24 25 26 27 28 29 30 31 public static void PhaserTestExample2 () throws InterruptedException, IOException { int solt = 3 ; Phaser phaser = new Phaser (1 ); Thread[] threads = new Thread [solt]; Runnable r = () ->{ System.out.println(Thread.currentThread().getName() + ":任务准备" ); int i = phaser.arriveAndAwaitAdvance(); System.out.println(Thread.currentThread().getName() + ": 执行完任务,当前phase =" + i + "" ); }; phaser.bulkRegister(solt); for (int i = 0 ; i < solt; i++) { threads[i] = new Thread (r); threads[i].setName("PhaserTestExample2-" + i); threads[i].start(); } System.out.println("Press ENTER to continue" ); BufferedReader reader = new BufferedReader (new InputStreamReader (System.in)); reader.readLine(); phaser.arriveAndDeregister(); int registeredParties = phaser.getRegisteredParties(); int arrivedParties = phaser.getArrivedParties(); System.out.println("registeredParties:" + registeredParties); System.out.println("arrivedParties:" + arrivedParties); }
输出结果
1 2 3 4 5 6 7 8 9 10 PhaserTestExample2-0:任务准备 PhaserTestExample2-2:任务准备 Press ENTER to continue PhaserTestExample2-1:任务准备 [输入回车] PhaserTestExample2-1: 执行完任务,当前phase =1 PhaserTestExample2-0: 执行完任务,当前phase =1 PhaserTestExample2-2: 执行完任务,当前phase =1 registeredParties:3 arrivedParties:0
由于 Phaser 设置的阶段为1 当所有线程到达的时候,发现是阶段到达的阶段是0,不是1,于是所有线程继续等待,当执行 arriveAndDeregister 的时候,所有已经执行到0的阶段参与者都+1, 发现自己到达的阶段和 Phaser 一直,则运行。以上示例中,只有当用户按下回车之后,任务才真正开始执行。这里主线程Main相当于一个协调者,用来控制开关打开的时机,arriveAndDeregister方法不会阻塞,该方法会将到达数加1,同时减少一个参与者数量,最终返回线程到达时的phase值。
Example3
通过Phaser控制任务的执行轮数
1 2 3 4 5 6 7 8 9 10 11 12 13 14 15 16 17 18 19 20 21 22 23 24 25 26 public static void PhaserTestExample3 () throws Exception { int solt = 3 ; Thread[] threads = new Thread [solt]; Phaser phaser = new Phaser () { @Override protected boolean onAdvance (int phase, int registeredParties) { System.out.println("---------------PHASE[" + phase + "],Parties[" + registeredParties + "] ---------------" ); return phase + 1 >= solt || registeredParties == 0 ; } }; phaser.bulkRegister(solt); Runnable r = () ->{ while (!phaser.isTerminated()) { int i = phaser.arriveAndAwaitAdvance(); System.out.println(Thread.currentThread().getName() + ": 执行完任务" ); } }; for (int i = 0 ; i < solt; i++) { threads[i] = new Thread (r); threads[i].setName("PhaserTestExample3-" + i); threads[i].start(); } }
输出
1 2 3 4 5 6 7 8 9 10 11 12 ---------------PHASE[0 ],Parties[3 ] --------------- PhaserTestExample3-2 : 执行完任务 PhaserTestExample3-1 : 执行完任务 PhaserTestExample3-0 : 执行完任务 ---------------PHASE[1 ],Parties[3 ] --------------- PhaserTestExample3-0 : 执行完任务 PhaserTestExample3-2 : 执行完任务 PhaserTestExample3-1 : 执行完任务 ---------------PHASE[2 ],Parties[3 ] --------------- PhaserTestExample3-1 : 执行完任务 PhaserTestExample3-2 : 执行完任务 PhaserTestExample3-0 : 执行完任务
以上示例中,我们在创建Phaser对象时,覆写了onAdvance方法,这个方法类似于CyclicBarrier中的barrierAction任务。
也就是说,当最后一个参与者到达时,会触发onAdvance方法,入参phase表示到达时的phase值,registeredParties表示到达时的参与者数量,返回true表示需要终止Phaser。
我们通过phase + 1 >= repeats ,来控制阶段(phase)数的上限为2(从0开始计),最终控制了每个线程的执行任务次数为repeats次。如果返回 True 则Phaser结束
Example4
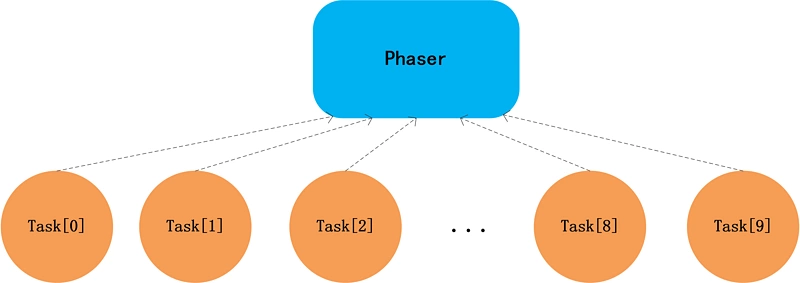
Phaser支持分层功能,我们先来考虑下如何用利用Phaser的分层来实现高并发时的优化,在示例三中,我们其实创建了10个线程,然后10个线程共用一个Phaser对象,如下图:
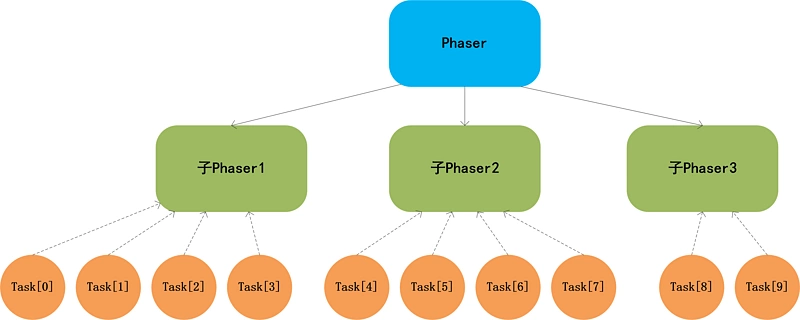
如果任务数继续增大,那么同步产生的开销会非常大,利用Phaser分层的功能,我们可以限定每个Phaser对象的最大使用线程(任务数),如下图:
1 2 3 4 5 6 7 8 9 10 11 12 13 14 15 16 17 18 19 20 21 22 23 24 25 26 27 28 29 30 31 32 33 34 35 36 37 38 39 40 41 42 43 44 45 46 47 48 49 50 51 52 53 54 55 public class PhaserTest4 { private static final int TASKS_PER_PHASER = 4 ; public static void main (String[] args) throws IOException { int repeats = 3 ; Phaser phaser = new Phaser () { @Override protected boolean onAdvance (int phase, int registeredParties) { System.out.println("---------------PHASE[" + phase + "],Parties[" + registeredParties + "] ---------------" ); return phase + 1 >= repeats || registeredParties == 0 ; } }; Tasker[] taskers = new Tasker [10 ]; build(taskers, 0 , taskers.length, phaser); for (int i = 0 ; i < taskers.length; i++) { Thread thread = new Thread (taskers[i]); thread.start(); } } private static void build (Tasker[] taskers, int lo, int hi, Phaser phaser) { if (hi - lo > TASKS_PER_PHASER) { for (int i = lo; i < hi; i += TASKS_PER_PHASER) { int j = Math.min(i + TASKS_PER_PHASER, hi); build(taskers, i, j, new Phaser (phaser)); } } else { for (int i = lo; i < hi; ++i) taskers[i] = new Tasker (i, phaser); } } static class Tasker implements Runnable { private final Phaser phaser; private int i; Tasker(int i, Phaser phaser) { this .i = i; this .phaser = phaser; this .phaser.register(); } @Override public void run () { while (!phaser.isTerminated()) { int i = phaser.arriveAndAwaitAdvance(); System.out.println(Thread.currentThread().getName() + ": 执行完任务, index:" + this .i); } } } }
输出结果如下:
1 2 3 4 5 6 7 8 9 10 11 12 13 14 15 16 17 18 19 20 21 22 23 24 25 26 27 28 29 30 31 32 33 ---------------PHASE[0],Parties[3] --------------- Thread-9: 执行完任务, index:9 Thread-0: 执行完任务, index:0 Thread-8: 执行完任务, index:8 Thread-7: 执行完任务, index:7 Thread-2: 执行完任务, index:2 Thread-5: 执行完任务, index:5 Thread-3: 执行完任务, index:3 Thread-6: 执行完任务, index:6 Thread-4: 执行完任务, index:4 Thread-1: 执行完任务, index:1 ---------------PHASE[1],Parties[3] --------------- Thread-1: 执行完任务, index:1 Thread-8: 执行完任务, index:8 Thread-9: 执行完任务, index:9 Thread-5: 执行完任务, index:5 Thread-3: 执行完任务, index:3 Thread-2: 执行完任务, index:2 Thread-4: 执行完任务, index:4 Thread-7: 执行完任务, index:7 Thread-6: 执行完任务, index:6 Thread-0: 执行完任务, index:0 ---------------PHASE[2],Parties[3] --------------- Thread-0: 执行完任务, index:0 Thread-8: 执行完任务, index:8 Thread-1: 执行完任务, index:1 Thread-6: 执行完任务, index:6 Thread-9: 执行完任务, index:9 Thread-3: 执行完任务, index:3 Thread-5: 执行完任务, index:5 Thread-4: 执行完任务, index:4 Thread-7: 执行完任务, index:7 Thread-2: 执行完任务, index:2
详解
由于Phaser的实现过于复杂,本篇章不做详解,又想去请看Phaser的源码分析
Exchanger
功能
Exchanger类允许在2个线程间定义同步点,当2个线程到达这个点,他们相互交换数据类型,使用第一个线程的数据类型变成第二个的,然后第二个线程的数据类型变成第一个的
举例
以下的例子,将两个线程间的线程名交换,交换之前阻塞状态
1 2 3 4 5 6 7 8 9 10 11 12 13 14 15 16 17 18 19 20 21 public static void exchangerTestExample () throws Exception { final Exchanger<String> exchanger = new Exchanger <String>(); Runnable r = () ->{ try { String myName = Thread.currentThread().getName(); Random random = new Random (); TimeUnit.SECONDS.sleep(random.nextInt(5 )); System.out.println(myName + " want to exchange data and i waiting" ); String hisName = exchanger.exchange(Thread.currentThread().getName()); System.out.println(myName + ": " + hisName); } catch (InterruptedException e) { e.printStackTrace(); } }; Thread[] threads = new Thread [2 ]; for (int i = 0 ; i < 2 ; i++) { threads[i] = new Thread (r); threads[i].setName("exchangerTestExample-" + i); threads[i].start(); } }
输出
1 2 3 4 5 exchangerTestExample-1 want to exchange data and i waiting [...] exchangerTestExample-0 want to exchange data and i waiting exchangerTestExample-0: exchangerTestExample-1 exchangerTestExample-1: exchangerTestExample-0
根据上面的输出,我们得出结论,当第一个线程阻塞在 exchanger.exchange(Thread.currentThread().getName()) 方法中,因为 exchanger 没有数据因而线程阻塞,当第二个线程执行到 相同的位置的时候,发现里面有数据,则立刻交换,并且唤醒第一个线程。
详解
Exchanger 是一种无锁算法
构造
1 2 3 4 public Exchanger () { participant = new Participant (); }
1 2 3 4 5 public V exchange (V x) throws InterruptedException public V exchange (V x, long timeout, TimeUnit unit) throws InterruptedException, TimeoutException
Participant 和 Node
Participant 是将 Node 封装成了 ThreadLocal 对象。
1 2 3 4 5 6 7 8 9 10 11 12 13 static final class Participant extends ThreadLocal <Node> { public Node initialValue () { return new Node (); } } @sun .misc.Contended static final class Node { int index; int bound; int collides; int hash; Object item; volatile Object match; volatile Thread parked; }
这里我们讲几个概念
index:arena的下标,多个槽位的时候利用;
bound:上一次记录的Exchanger.bound;
collides:在当前bound下CAS失败的次数;
hash:伪随机数,用于自旋;
item:这个线程的当前项,也就是需要交换的数据;
match:交换的数据;
parked:挂起时设置线程值,其他情况下为null;
我们现阶段先对这个几个有个印象,接下来我们详细分析一下交换的过程。
exchange 方法
1 2 3 4 5 6 7 8 9 10 11 12 13 14 15 16 17 18 public V exchange (V x) throws InterruptedException { Object v; Object item = (x == null ) ? NULL_ITEM : x; if ((arena != null || (v = slotExchange(item, false , 0L )) == null ) && ((Thread.interrupted() || (v = arenaExchange(item, false , 0L )) == null ))) throw new InterruptedException (); return (v == NULL_ITEM) ? null : (V)v; } private volatile Node[] arena;
我们看到这里有几个核心点
slotExchange 方法
arenaExchange 方法
arena 是干什么用的。
看到这,我们首先解决几个核心属性。
1 2 3 private final Participant participant;private volatile Node[] arena;private volatile Node slot;
为什么会有 arena数组槽? slot为单个槽,arena为数组槽, 他们都是Node类型。在这里可能会感觉到疑惑,slot作为Exchanger交换数据的场景,应该只需要一个就可以了啊?
为何还多了一个Participant 和数组类型的arena呢?
一个slot交换场所原则上来说应该是可以的,但实际情况却不是如此,多个参与者使用同一个交换场所时,会存在严重伸缩性问题。既然单个交换场所存在问题,那么我们就安排多个,也就是数组arena。通过数组arena来安排不同的线程使用不同的slot来降低竞争问题,并且可以保证最终一定会成对交换数据。但是Exchanger不是一来就会生成arena数组来降低竞争,只有当产生竞争是才会生成arena数组。 那么怎么将Node与当前线程绑定呢?
Participant,Participant 的作用就是为每个线程保留唯一的一个Node节点,它继承ThreadLocal,同时在Node节点中记录在arena中的下标index。
根据逻辑,我们可以知道,当arena 为空或者 slotExchange 为空的时候,执行 arenaExchange 方法。当我们第一次调用exchange 方法的时候,必然 arena 为空。我们往下看,看看 slotExchange 究竟干甚了什么?
slotExchange
1 2 3 4 5 6 7 8 9 10 11 12 13 14 15 16 17 18 19 20 21 22 23 24 25 26 27 28 29 30 31 32 33 34 35 36 37 38 39 40 41 42 43 44 45 46 47 48 49 50 51 52 53 54 55 56 57 58 59 60 61 62 63 64 65 66 67 68 69 70 71 72 73 74 75 76 77 78 79 80 81 82 83 84 85 86 87 88 89 90 91 private final Object slotExchange (Object item, boolean timed, long ns) { Node p = participant.get(); Thread t = Thread.currentThread(); if (t.isInterrupted()) return null ; for (Node q;;) { if ((q = slot) != null ) { if (U.compareAndSwapObject(this , SLOT, q, null )) { Object v = q.item; q.match = item; Thread w = q.parked; if (w != null ) U.unpark(w); return v; } if (NCPU > 1 && bound == 0 && U.compareAndSwapInt(this , BOUND, 0 , SEQ)) arena = new Node [(FULL + 2 ) << ASHIFT]; } else if (arena != null ) return null ; else { p.item = item; if (U.compareAndSwapObject(this , SLOT, null , p)) break ; p.item = null ; } } int h = p.hash; long end = timed ? System.nanoTime() + ns : 0L ; int spins = (NCPU > 1 ) ? SPINS : 1 ; Object v; while ((v = p.match) == null ) { if (spins > 0 ) { h ^= h << 1 ; h ^= h >>> 3 ; h ^= h << 10 ; if (h == 0 ) h = SPINS | (int )t.getId(); else if (h < 0 && (--spins & ((SPINS >>> 1 ) - 1 )) == 0 ) Thread.yield (); } else if (slot != p) spins = SPINS; else if (!t.isInterrupted() && arena == null && (!timed || (ns = end - System.nanoTime()) > 0L )) { U.putObject(t, BLOCKER, this ); p.parked = t; if (slot == p) U.park(false , ns); p.parked = null ; U.putObject(t, BLOCKER, null ); } else if (U.compareAndSwapObject(this , SLOT, p, null )) { v = timed && ns <= 0L && !t.isInterrupted() ? TIMED_OUT : null ; break ; } } U.putOrderedObject(p, MATCH, null ); p.item = null ; p.hash = h; return v; }
程序首先通过participant获取当前线程节点Node。检测是否中断,如果中断return null,等待后续抛出InterruptedException异常。
如果slot不为null,则进行slot消除,成功直接返回数据V,否则失败,则创建arena消除数组。 (如果slot不为null 则证明第一个进入交换区的线程已经准备好数据也就是拿到了q,然后让将自己的q 赋值给match, 然后惊醒slot消除)
如果slot为null,但arena不为null,则返回null,进入arenaExchange逻辑。 (arena 不为null 的逻辑在solt 不为null 且赋值 U.compareAndSwapObject(this, SLOT, q, null) 失败),证明一瞬间 SLOT 发生了金正,改变了原来的非Q的状态。
如果slot为null,且arena也为null,则尝试占领该slot,失败重试,成功则跳出循环进入spin+block(自旋+阻塞)模式。
在自旋+阻塞模式中,首先取得结束时间和自旋次数。如果match(做releasing操作的线程传递的项)为null,其首先尝试spins+随机次自旋(改自旋使用当前节点中的hash,并改变之)和退让。当自旋数为0后,假如slot发生了改变(slot != p)则重置自旋数并重试。
否则假如:当前未中断&arena为null&(当前不是限时版本或者限时版本+当前时间未结束):阻塞或者限时阻塞。假如:当前中断或者arena不为null或者当前为限时版本+时间已经结束:不限时版本:置v为null;限时版本:
如果时间结束以及未中断则TIMED_OUT;否则给出null(原因是探测到arena非空或者当前线程中断)。 match不为空时跳出循环。
arenaExchange
此方法被执行时表示多个线程进入交换区交换数据,arena数组已被初始化,此方法中的一些处理方式和slotExchange比较类似,它是通过遍历arena数组找到需要交换的数据。
Exchanger最复杂的地方就是它的多槽位交换(arenaExchange),我们先看下,什么时候会触发多槽位交换?
单槽交换(slotExchange)中有这样一段代码:
1 2 3 4 5 6 7 8 9 10 11 12 13 14 15 16 17 18 19 20 for (Node q;;) { if ((q = slot) != null ) { if (U.compareAndSwapObject(this , SLOT, q, null )) { Object v = q.item; q.match = item; Thread w = q.parked; if (w != null ) U.unpark(w); return v; } if (NCPU > 1 && bound == 0 && U.compareAndSwapInt(this , BOUND, 0 , SEQ)) arena = new Node [(FULL + 2 ) << ASHIFT]; } }
也就是说,如果在单槽交换中,同时出现了多个配对线程竞争修改slot槽位,导致某个线程CAS修改slot失败时,就会初始化arena多槽数组,后续所有的交换都会走arenaExchange,多槽交换方法arenaExchange的整体流程和slotExchange类似,主要区别在于它会根据当前线程的数据携带结点Node中的index字段计算出命中的槽位。如果槽位被占用,说明已经有线程先到了,之后的处理和slotExchange一样;
如果槽位有效且为null,说明当前线程是先到的,就占用槽位,然后按照:spin->yield->block这种锁升级的顺序进行优化的等待,等不到配对线程就会进入阻塞。
1 2 3 4 5 6 7 8 9 10 11 12 13 14 15 16 17 18 19 20 21 22 23 24 25 26 27 28 29 30 31 32 33 34 35 36 37 38 39 40 41 42 43 44 45 46 47 48 49 50 51 52 53 54 55 56 57 58 59 60 61 62 63 64 65 66 67 68 69 70 71 72 73 74 75 76 77 78 79 80 81 82 83 84 private final Object arenaExchange (Object item, boolean timed, long ns) { Node[] a = arena; Node p = participant.get(); for (int i = p.index;;) { int b, m, c; long j; Node q = (Node)U.getObjectVolatile(a, j = (i << ASHIFT) + ABASE); if (q != null && U.compareAndSwapObject(a, j, q, null )) { Object v = q.item; q.match = item; Thread w = q.parked; if (w != null ) U.unpark(w); return v; } else if (i <= (m = (b = bound) & MMASK) && q == null ) { p.item = item; if (U.compareAndSwapObject(a, j, null , p)) { long end = (timed && m == 0 ) ? System.nanoTime() + ns : 0L ; Thread t = Thread.currentThread(); for (int h = p.hash, spins = SPINS;;) { Object v = p.match; if (v != null ) { U.putOrderedObject(p, MATCH, null ); p.item = null ; p.hash = h; return v; } else if (spins > 0 ) { h ^= h << 1 ; h ^= h >>> 3 ; h ^= h << 10 ; if (h == 0 ) h = SPINS | (int )t.getId(); else if (h < 0 && (--spins & ((SPINS >>> 1 ) - 1 )) == 0 ) Thread.yield (); } else if (U.getObjectVolatile(a, j) != p) spins = SPINS; else if (!t.isInterrupted() && m == 0 && (!timed || (ns = end - System.nanoTime()) > 0L )) { U.putObject(t, BLOCKER, this ); p.parked = t; if (U.getObjectVolatile(a, j) == p) U.park(false , ns); p.parked = null ; U.putObject(t, BLOCKER, null ); } else if (U.getObjectVolatile(a, j) == p && U.compareAndSwapObject(a, j, p, null )) { if (m != 0 ) U.compareAndSwapInt(this , BOUND, b, b + SEQ - 1 ); p.item = null ; p.hash = h; i = p.index >>>= 1 ; if (Thread.interrupted()) return null ; if (timed && m == 0 && ns <= 0L ) return TIMED_OUT; break ; } } } else p.item = null ; } else { if (p.bound != b) { p.bound = b; p.collides = 0 ; i = (i != m || m == 0 ) ? m : m - 1 ; } else if ((c = p.collides) < m || m == FULL || !U.compareAndSwapInt(this , BOUND, b, b + SEQ + 1 )) { p.collides = c + 1 ; i = (i == 0 ) ? m : i - 1 ; } else i = m + 1 ; p.index = i; } } }
总结
参考