MAP 类继承图
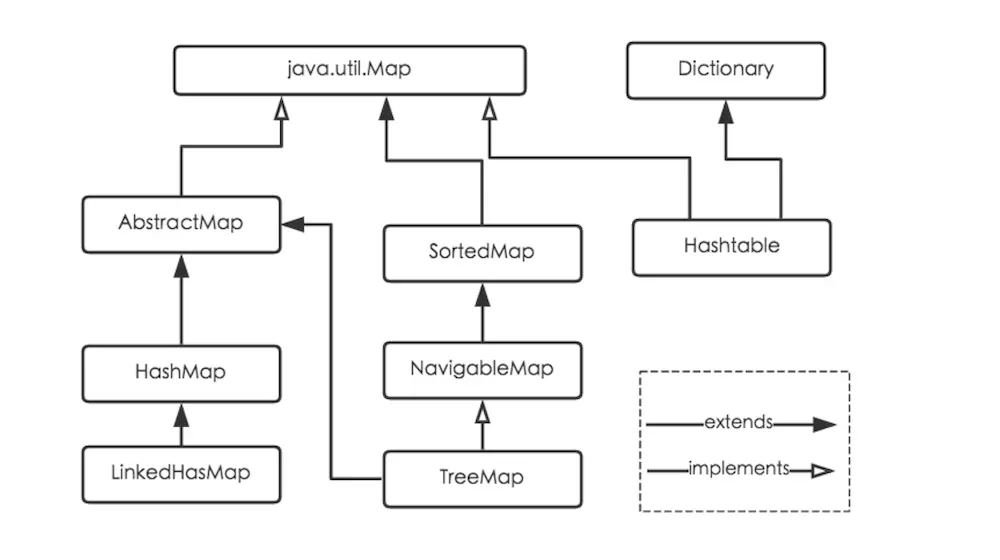
HashMap:
- KV结构,高效
- 无序
- key为null,但是只允许有一个key为null,再次说明,
- HashMap不是线程安全的。
LinkedHashMap:
LinkedHashMap是HashMap的子类,它将保持记录的插入顺序。TreeMap:
TreeMap实现了SortedMap接口,很明显,他将对插入的记录排序,
HashMap 内部结构
首先来看一下HashMap内部结构是什么样子的。通过观察源码,可以发现HashMap在实现上使用了数组+链表+红黑树三种数据结构
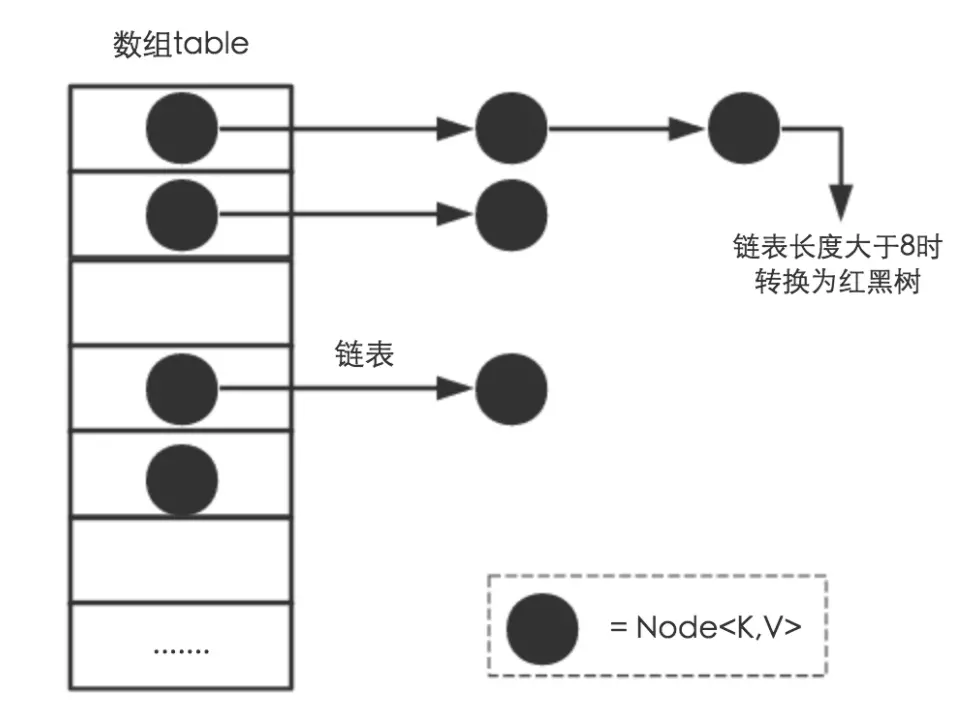
HashMap是通过计算key的hashCode来找到记录的存储位置的,那因为hash函数不会台完美的原因,势必要造成多个记录的key的hashCode一样的情况,上图展示了这种情况,完美情况下,我们希望每一个数组位置上仅有一个记录,但是很多情况下一个数组位置上会落入多个记录,也就是哈希冲突。
解决哈希冲突的方法主要有开发地址和链地址,HashMap采用了后者,将hashCode相同的记录放在同一个数组位置上,多个hashCode相同的记录被存储在一条链表上,我们知道,链表上的查询复杂的为O(N),当这个N很大的时候也就成了瓶颈,所以HashMap在链表的长度大于8的时候就会将链表转换为红黑树这种数据结构,红黑树的查询效率高达O(lgN),也就是说,复杂度降了一个数量级,完全可以适用于实际生产环境。下面是链表节点数据结构的代码:
1 | static class Node<K,V> implements Map.Entry<K,V> { |
下面是上面图中展示的数组:1
transient Node<K,V>[] table;
这个table就是存储数据的数组,上面图中的每个黑色的球是一个Node。下面展示了几个重要的成员变量:1
2
3
4
5
6
7
8
9
10
11
12
13
14
15
16
17
18
19
20
21
22
23
24
25
26
27
28
29
30
31
32
33
34
35
36
37
38
39/**
* The number of key-value mappings contained in this map.
*/
transient int size;
/**
* The next size value at which to resize (capacity * load factor).
*
* @serial
*/
// (The javadoc description is true upon serialization.
// Additionally, if the table array has not been allocated, this
// field holds the initial array capacity, or zero signifying
// DEFAULT_INITIAL_CAPACITY.)
int threshold;
/**
* The load factor for the hash table.
*
* @serial
*/
final float loadFactor;
/**
* The default initial capacity - MUST be a power of two.
*/
static final int DEFAULT_INITIAL_CAPACITY = 1 << 4; // aka 16
/**
* The maximum capacity, used if a higher value is implicitly specified
* by either of the constructors with arguments.
* MUST be a power of two <= 1<<30.
*/
static final int MAXIMUM_CAPACITY = 1 << 30;
/**
* The load factor used when none specified in constructor.
*/
static final float DEFAULT_LOAD_FACTOR = 0.75f;
需要注意的一点是,HashMap的哈希桶table的大小必须为2的n次方,也就是说必须为合数,初始大小为16,下文中将会说明为什么一定要是2的n次方。size字段的意思是当前记录数量,loadFactor是负载因子,默认为0.75,而threshold是作为扩容的阈值而存在的,它是由负载银子决定的。下面的方法是返回与给定数值最接近的2的n次方的值:1
2
3
4
5
6
7
8
9
10
11
12
13/**
* Returns a power of two size for the given target capacity.
*/
static final int tableSizeFor(int cap) {
int n = cap - 1;
n |= n >>> 1;
n |= n >>> 2;
n |= n >>> 4;
n |= n >>> 8;
n |= n >>> 16;
return (n < 0) ? 1 : (n >= MAXIMUM_CAPACITY) ? MAXIMUM_CAPACITY : n + 1;
}
HashMap如何确定记录的table位置
下面的方法hash展示了HashMap是如何计算记录的hashCode值的方法:1
2
3
4static final int hash(Object key) {
int h;
return (key == null) ? 0 : (h = key.hashCode()) ^ (h >>> 16);
}
上面的hash方法仅仅是第一步,它只是计算出了hashCode值,但是还可以确定table中的index,接下来的一步需要做的就是根据hashCode来定位index,也就是需要对hashCode取模(hashCode % length),length是table的长度,但是我们知道,取模运算是较为复杂的计算,是非常耗时的计算,那有没有方法不通过取模计算而达到取模的效果呢,答案是肯定的,上文中提到,table的长度必然是2的n次方,这点很重要,HashMap通过设定table的长度为2的n次方,在取模的时候就可以通过下面的算法来进行:1
int index = hashCode & (length -1)
在length总是2的n次方的前提下,上面的算法等效于hashCode%length,但是现在通过使用&代替了%,而&的效率要远比%高
HashMap插入元素的过程详解
1 | public V put(K key, V value) { |
过程的详细分析
- 首先判断table是否为null或者长度为0,如果是,那么调用方法resize来初始化table,resize的细节将在下文中进行分析,这个方法用来对HashMap的table数组扩容,它将发生在初始化table以及table中的记录数量达到阈值之后。
- 然后计算记录的hashCode,以及根据上文中提到的方法来计算记录在table中的index,如果发现index未知上为null,则调用newNode来创建一个新的链表节点,然后放在table的index位置上,此时表面没有哈希冲突。
- 如果table的index位置不为空,那么说明造成了哈希冲突,这时候如果记录和index位置上的记录相等,则直接覆盖,否则继续判断
- 如果index位置上的节点TreeNode,如果是,那么说明此时的index位置上是一颗红黑树,需要调用putTreeVal方法来将这新的记录插入到红黑树中去。否则走下面的逻辑。
- 如果index位置上的节点类型不是TreeNode,那么说明此位置上的哈希冲突还没有达到阈值,还是一个链表结构,那么就根据插入链表插入新节点的算法来找到合适的位置插入,这里面需要注意的是,新插入的记录会覆盖老的记录,如果这个新的记录是首次插入,那么就会插入到该index位置上链表的最尾部,这里面还需要一次判断,如果插入了新的节点之后达到了阈值,那么就需要调用方法+treeifyBin来讲链表转化为红黑树。
- 在插入完成之后,哈希桶中记录的数量是否达到了哈希桶设置的阈值,如果达到了,那么就需要调用方法resize来扩容。
HashMap扩容resize方法详解
上文分析了HashMap的put方法的细节,其中提到,当初始化table以及记录数量达到阈值之时会触发HashMap的扩容,而扩容是通过方法resize来进行的,下面来分析一下resize方法是如何工作的。
1 | final Node<K,V>[] resize() { |
上面展示了resize方法的细节,可以看到扩容的实现时较为复杂的,但是我们知道所谓扩容,就是新申请一个较大容量的数组table,然后将原来的table中的内容都重新计算哈希落到新的数组table中来,然后将老的table释放掉。这里面有两个关键点,一个是新哈希数组的申请以及老哈希数组的释放,另外一个是重新计算记录的哈希值以将其插入到新的table中去。首先第一个问题是,扩容会扩大到多少,通过观察上面的代码可以确定,每次扩容都会扩大table的容量为原来的两倍,当然有一个最大值,如果HashMap的容量已经达到最大值了,那么就不会再进行扩容操作了。第二个问题是HashMap是如何在扩容之后将记录从老的table迁移到新的table中来的。上文中已经提到,table的长度确保是2的n次方,那么有意思的是,每次扩容容量变为原来的两倍,那么一个记录在新table中的位置要么就和原来一样,要么就需要迁移到(oldCap + index)的位置上。下面简单来证明一下这个算法的正确性:
1 | 假设原来的table大小为4,那么扩容之后会变为8,那么对于一个元素A来说,如果他的hashCode值为3,那么他在原来的table |
之所以可以这么算是因为
还是上面的两个元素A和B,哈希值分别为3和47,在table长度为4的情况下,因为3 二进制为 11,所以A和B会有两位参与运算来
获得index,A和B的二进制分别为:1
23 : 11
47: 101111
在table的length为4的前提下:1
23-> 11 & 11 = 3
47-> 000011 & 101111 = 3
在扩容后,length变为8:1
23-> 011 & 111 = 3
47-> 10111 & 00111 = 7
对于3来说,新增的参与运算的位为0,所以index不变,而对于47来说,新增的参与运算的位为1,所以index需要变为(index + oldCap)
HashMap获取记录操作详解
首先,因为可能会发生哈希冲突,所以我们需要获取的记录可能会存储在一个链表上,也可能存储在一棵红黑树上,这需要实际判断,所以,获取操作首先应该就算记录的hashCode,然后根据hashCode来计算在table中的index,然后判断该数组位置上是一条链表还是一棵红黑树,如果是链表,那么就遍历链表来找到我们需要的记录,否则如果是一棵红黑树,那么就通过遍历这棵红黑树找到我们需要的记录.
当然,寻找记录可能会找不到,因为可能我们获取的记录根本就不存在,那么就要返回null暗示用户,当然,HashMap返回null不仅可以代表没有这个记录的信息之外,还可以代表该记录key对应着的value就是null,所以你不能通过HashMap是否返回null来判断HashMap中是否有相应的记录,如果你有类似的需求,你应该调用HashMap的方法:containsKey,这个方法将在下文中进行分析。
1 | public V get(Object key) { |
首先会获得当前table的一个快照,然后根据需要查找的记录的key的hashCode来定位到table中的index,如果该位置为null,说明没有没有记录落到该位置上,也就不存在我们查找的记录,直接返回null。如果该位置不为null,说明至少有一个记录落到该位置上来,那么就判断该位置的第一个记录是否使我们查找的记录,如果是则直接返回,否则,根据该index上是一条链表还是一棵红黑树来分别查找我们需要的记录,找到则返回记录,否则返回null。下面来看一下如何判断HashMap中是否有一个记录的方法:1
2
3public boolean containsKey(Object key) {
return getNode(hash(key), key) != null;
}
这个方法调用了getNode来从table中获得一个Node,返回null,说明不存在该记录,否则存在,containsKey方法和get方法都是通过调用getNode方法来进行的,但是他们的区别在于get方法在判断得到的Node不为null的情况下任然可能返回null,因为Node的value可能为null,所以应该在合适的时候调用合适的方法。
HashMap删除记录详解
现在来看一下HashMap是如何实现删除一个记录的。下面首先展示了相关的代码:1
2
3
4
5
6
7
8
9
10
11
12
13
14
15
16
17
18
19
20
21
22
23
24
25
26
27
28
29
30
31
32
33
34
35
36
37
38
39
40
41
42
43
44
45
46public V remove(Object key) {
Node<K,V> e;
return (e = removeNode(hash(key), key, null, false, true)) == null ?
null : e.value;
}
final Node<K,V> removeNode(int hash, Object key, Object value,
boolean matchValue, boolean movable) {
Node<K,V>[] tab; Node<K,V> p; int n, index;
if ((tab = table) != null && (n = tab.length) > 0 &&
(p = tab[index = (n - 1) & hash]) != null) {
Node<K,V> node = null, e; K k; V v;
if (p.hash == hash &&
((k = p.key) == key || (key != null && key.equals(k))))
node = p;
else if ((e = p.next) != null) {
if (p instanceof TreeNode)
node = ((TreeNode<K,V>)p).getTreeNode(hash, key);
else {
do {
if (e.hash == hash &&
((k = e.key) == key ||
(key != null && key.equals(k)))) {
node = e;
break;
}
p = e;
} while ((e = e.next) != null);
}
}
if (node != null && (!matchValue || (v = node.value) == value ||
(value != null && value.equals(v)))) {
if (node instanceof TreeNode)
((TreeNode<K,V>)node).removeTreeNode(this, tab, movable);
else if (node == p)
tab[index] = node.next;
else
p.next = node.next;
++modCount;
--size;
afterNodeRemoval(node);
return node;
}
}
return null;
}
首先,通过记录的hashCode来找到他在table中的index,因为最后需要返回被删除节点的值,所以需要记录被删除的节点。当然记录被删除的节点也是有意义的,比如对于table中的index位置上为一条链表的情况来说,我们只需要记住需要删除的Node,然后真正删除的时候就可以只需要操作该node就可以了,当然对于链表的相关操作详解将在另外的篇章中进行。以及红黑树等高级数据结构的分析总结也会在新的篇章中介绍,目前只需要知道HashMap通过在合适的时候使用不同的数据结构来达到高效的目的就可以了。
赞赏一下