概述
volatile关键字是Java并发编程当中不可或缺的一环,维序着Java共享变量的可见性和有序性。由于volatile关键字是与Java的内存模型有关的,因此在讲述volatile关键之前,我们先来回顾一下volatile的应用场景。
Java是跨平台的,因此针对于不同平台,JVM实现方式也有所不同,但是必遵循一定的规范,来统一Java编程的基本原则,这个规范被成为Java虚拟机规范。Java内存模型(Java Memory Model,JMM)来屏蔽各个硬件平台和操作系统的内存访问差异,以实现让Java程序在各种平台下都能达到一致的内存访问效果.具体内容请参考我的另一篇博文Java内存模型(1)JMM是什么
我们先来看volatile是用来解决什么问题的。
volatile应用场景
volatile 解决可见性
1
2
3
4
5
6
7
8
9
10
11
12
13
14
15
16
17
18
19
20
21
22
23
24
25
26
|
public class VolatileVisibility {
boolean isStop = false;
public void test() throws InterruptedException {
Thread t1 = new Thread(){
public void run() {
isStop=true;
}
};
Thread t2 = new Thread(){
public void run() {
while (!isStop){
};
}
};
t2.start();
Thread.sleep(100);
t1.start();
}
public static void main(String args[]) throws InterruptedException {
for (int i =0;i<25;i++){
new VolatileVisibility().test();
}
}
}
|
上面这段代码可能永远也不会结束,因为线程t1对isStop的修改,线程t2可能对此并不可见。当然只是可能,所以为了放大可见性问题,我这里作了25次循环。只要有一组线程发生“线程t1对isStop的赋值,线程t2对此不可见”的情况,就不会退出程序。
假如你给isStop添加一个 volatile 关键字,那么你会发现程序立马就会退出。
针对于可见性,还有一个经典的double check例子DoubleCheckLock
volatile是否可以解决原子性
1
2
3
4
5
6
7
8
9
10
11
12
13
14
15
16
17
18
19
20
21
22
23
24
| public class VolatileCode {
public static volatile int t = 0;
public static void main(String[] args) throws InterruptedException {
Thread[] threads = new Thread[10];
for(int i = 0; i < 10; i++){
threads[i] = new Thread(() -> {
for(int j = 0; j < 1000; j++){
t += 1;
}
});
threads[i].start();
}
for (Thread thread : threads) {
thread.join();
}
System.out.println(t);
}
}
|
上述代码我们运行了几次,得到的结果有可能不是10000,可得出结论,volatile无法解决原子性问题。
volatile 有序性
1
2
3
4
5
6
7
8
9
10
11
12
13
14
15
16
17
18
19
20
21
22
23
24
25
26
27
28
29
30
31
| public class OrderlyDemo {
private static int x,y,a,b=0;
private static int count = 0;
public static void main(String[] args) throws InterruptedException {
while (true) {
x = 0;
y = 0;
a = 0;
b = 0;
Thread threadA = new Thread(() -> {
a = 3;
x = b;
});
Thread threadB = new Thread(() -> {
b = 3;
y = a;
});
threadA.start();
threadB.start();
threadA.join();
threadB.join();
count++;
if (x == 0 && y==0) {
System.out.println("执行次数:"+count+","+"x:"+x +" y:"+y);
break;
}
}
}
}
|
结果
上述代码中,循环启动线程A,B,如果说x,y都等于0时,程序退出。count是程序次数计数器。下图是控制台程序打印部分结果。从图上可以分析出x,y都等于0时,线程A的a = 3; x = b;两行代码做了重排序,线程B中 b = 3;y = a;两行代码也做了重排序。这就是JIT编译器优化代码重排序后的结果。volatile 关键字是具有屏障功能的,也就是说volatile变量的写前后,编译器不可以进行重排。
看第二个例子:
1
2
3
4
5
6
7
8
9
10
11
12
13
14
15
16
17
18
19
20
21
22
23
24
25
26
27
28
29
30
31
32
33
34
35
36
37
38
39
40
41
42
43
44
45
46
|
public class OrderlyDemo {
private static int x,y,a,b=0;
private static volatile int c = 0;
private static volatile int d = 0;
private static int count = 0;
public static void main(String[] args) throws InterruptedException {
while (true) {
x = 0;
y = 0;
a = 0;
b = 0;
c = 0;
d = 0;
Thread threadA = new Thread(new Runnable() {
@Override
public void run() {
a = 3;
c = 4;
x = b;
}
});
Thread threadB = new Thread(new Runnable() {
@Override
public void run() {
b = 3;
d = 4;
y = a;
}
});
threadA.start();
threadB.start();
threadA.join();
threadB.join();
count++;
if (x == 0 && y==0) {
break;
}
}
}
}
|
如上述代码,将屏障放在中间,会禁止上下指令重排,x,y变量不可能同时为0,该程序会一直陷入死循环,结束不了。
原理
有序性和可见性产生原因
总的来说,volatile可以保证在多线程下共享变量的可见性和有序性。那么,之所以产生有序性和可见性的原因有两点
- 1、 指令重排序
- 2、 MESI协议的导致的缓存未刷新。
而指令重排序,则又分为,编译器重排序和CPU重排序,这里重排序的原因不在赘述,详情请参见Java内存模型(2)编译器重排序和Java内存模型(1)JMM是什么,这里面详细阐述了CPU指令重排序和编译器重排序的原理。
剩下的就是MESI协议导致的不可见原因,详情可以参考CPU缓存一致性协议-深入理解内存屏障, MESI协议是一个基础协议,在不同架构洗下的CPU会有不同形式的实现,例如X86下的CPU使用采用的是改进型的MESI协议。
因此,了解产生原因之后,我们就需要提出解决办法,思路就是很清楚了1、禁止指令重排序,2、强制令MESI协议中的中间状态刷入缓存当中。
如果你了解MESI协议,那么事实上,MESI协议其实也是一种指令重排,只不过是伪重排,这和CPU重排序是一个道理,CPU并没有将指令的顺序发生改变,而是各个指令的执行完的时间不是一样的,也就是说,顺序执行,乱序完成。了解这个事实,解决思路就非常明了,那就是内存屏障。由于不同的平台CPU实现的机制不同,各个编译器对代码的优化方式不同,因此,JMM不得不考虑一种规则,适用于所有的平台,因此,JMM规定了四中屏障
屏障类型| 指令示例| 说明|
|—-|—-|—-
LoadLoadBarriers| Load1;LoadLoad;Load2 |该屏障确保Load1数据的装载先于Load2及其后所有装载指令的的操作
StoreStoreBarriers| Store1;StoreStore;Store2 |该屏障确保Store1立刻刷新数据到内存(使其对其他处理器可见)的操作先于Store2及其后所有存储指令的操作
LoadStoreBarriers| Load1;LoadStore;Store2| 确保Load1的数据装载先于Store2及其后所有的存储指令刷新数据到内存的操作
StoreLoadBarriers |Store1;StoreLoad;Load1 |该屏障确保Store1立刻刷新数据到内存的操作先于Load2及其后所有装载装载指令的操作.它会使该屏障之前的所有内存访问指令(存储指令和访问指令)完成之后,才执行该屏障之后的内存访问指令
- 当第二个操作是volatile写时,不管第一个操作是什么,都不能重排序。这个规则确保volatile写之前的操作不会被编译器重排序到volatile写之后。
- 当第一个操作是volatile读时,不管第二个操作是什么,都不能重排序。这个规则确保volatile读之后的操作不会被编译器重排序到volatile读之前。
- 当第一个操作是volatile写,第二个操作是volatile读时,不能重排序。
为了实现volatile的内存语义,编译器在生成字节码时,会在指令序列中插入内存屏障来禁止特定类型的处理器重排序。对于编译器来说,发现一个最优布置来最小化插入屏障的总数几乎不可能。为此,JMM采取保守策略。下面是基于保守策略的JMM内存屏障插入策略:
在每个volatile写操作的前面插入一个StoreStore屏障。
在每个volatile写操作的后面插入一个StoreLoad屏障。
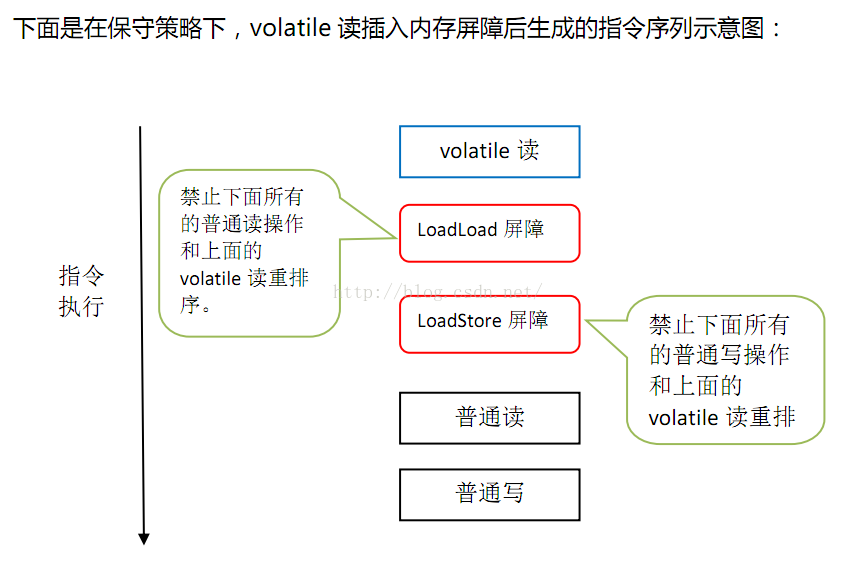
在每个volatile读操作的后面插入一个LoadLoad屏障。
在每个volatile读操作的后面插入一个LoadStore屏障。
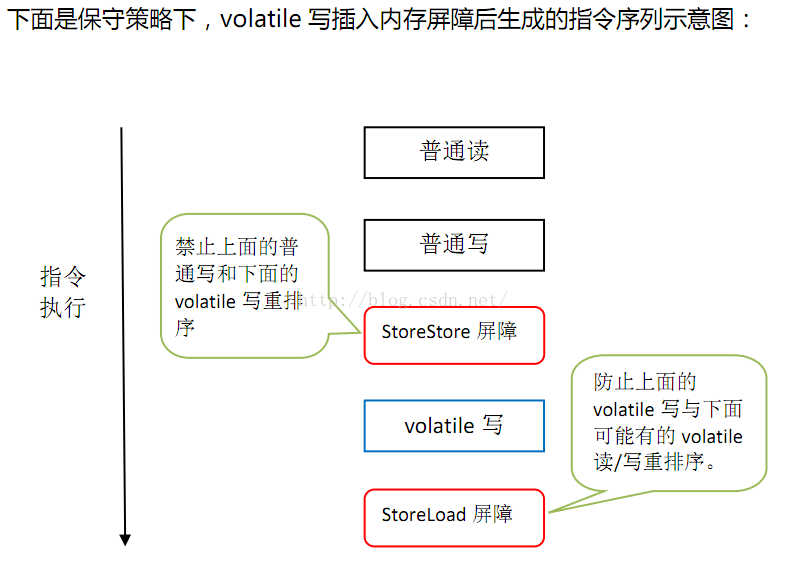
上图的StoreStore屏障可以保证在volatile写之前,其前面的所有普通写操作已经对任意处理器可见了,因为StoreStore屏障将保障上面所有的普通写在volatile写之前刷新到主内存
总结来说,volatile 可见性包括两个方面:
对于第二个方面,主要是通过写 volatile 变量时的 Barrier 保证写 volatile 之前的操作先于写 volatile 变量之前发生。最后还一个特殊的,如果能用到 StoreLoad Barrier,写 volatile 后一般会触发 Store Buffer 的刷写,所以写操作能「立即」被别的 CPU 看到。
X86下的内存屏障
在CPU缓存一致性协议(2)- 缓存一致性性模型) 我们已经讨论了x86下TSO模型是只有 StoreLoad 是允许重排序的,也就是说 MESI协议的StoreBuffer的引入,会是的StoreLoad有乱序执行的可能,因此,我们需要在禁止 StoreLoad的排序。而其他的屏障,我们只需要保证,编译器不会在编译期间,进行优化就可以了。
HotSpot原理
接下来,我们将会以JDK1.8的源码来分析一下 volatile 的实现原理
字节码上的区别
1
2
3
4
5
6
7
8
9
10
11
12
| public class VolatileCode {
volatile int val = 0;
int val2 = 1;
public int add(){
val++;
return val;
}
public int add2(){
val2++;
return val2;
}
}
|
我们编译,并且用javap 来查看字节码
1
2
3
4
5
6
7
8
9
10
11
12
13
14
15
16
17
18
19
20
21
22
23
24
25
26
27
28
29
30
31
32
33
34
35
36
37
38
39
40
41
42
43
44
45
46
47
48
|
volatile int val;
descriptor: I
flags: ACC_VOLATILE
int val2;
descriptor: I
flags:
public int add();
descriptor: ()I
flags: ACC_PUBLIC
Code:
stack=3, locals=1, args_size=1
0: aload_0
1: dup
2: getfield #2
5: iconst_1
6: iadd
7: putfield #2
10: aload_0
11: getfield #2
14: ireturn
LineNumberTable:
line 7: 0
line 8: 10
public int add2();
descriptor: ()I
flags: ACC_PUBLIC
Code:
stack=3, locals=1, args_size=1
0: aload_0
1: dup
2: getfield #3
5: iconst_1
6: iadd
7: putfield #3
10: aload_0
11: getfield #3
14: ireturn
LineNumberTable:
line 11: 0
line 12: 10
}
|
从javap的输出来看,volatile和非volatile变量没有任何区别,从Java虚拟机规范可知,某个字段是否是volatile变量是通过用来描述字段属性的access_flags来决定的,通过特定的标识位来识别,如下图:

从javap的输出分析可知,并没有专门针对volatile变量的特殊字节码指令,其处理逻辑还是在属性读写的字节码指令中,相关的指令有四个,_getstatic/_putstatic,_getfield/_putfield,
Hotspot内的区别
我们都知道,JVM执行字节码需要解释器(Interpreter)。 HotSpot虚拟机中支持两种解释器——CppInterpreter 和 TemplateInterpreter,对于一个编译好的JVM可执行程序来说,其使用的解释器是固定的,不可根据运行时条件改变,绝大多数JVM实例都使用TemplateInterpreter,下面也将分析基于TemplateInterpreter 的字节码执行。可以参考文档 [1] 了解这两种解释器的原理。
以x86平台为例,对于TemplateInterpreter,字节码对应的C/C++/汇编实现存放在/src/hotspot/cpu/x86/templateTable_x86.cpp文件中。
X86平台下,getfield和putfield的字节码模板指令如下hotspot/src/cpu/x86/vm/templateTable_x86.cpp
读操作
1
2
3
| void TemplateTable::getfield(int byte_no) {
getfield_or_static(byte_no, false);
}
|
_getstatic / _getfield适用于所有类型的字段属性读取,因此在具体实现时需要根据flags中保存的属性类型适配对应的处理逻辑,为了避免每次都要判断属性类型,OpenJDK增加了几个自定义的带目标类型的属性读取的字节码指令,如_fast_igetfield
1
2
3
4
5
6
7
8
9
10
11
12
13
14
15
16
17
18
19
20
21
22
23
24
25
26
27
28
29
30
31
32
33
34
35
36
37
38
39
40
41
42
43
44
45
46
47
48
49
50
51
52
53
54
55
56
57
58
59
60
61
62
63
64
65
66
67
68
69
70
71
72
73
74
75
76
77
78
79
80
81
82
83
84
85
86
87
88
89
90
91
92
93
94
95
96
97
98
99
100
101
102
103
104
105
106
107
108
109
110
111
112
113
114
115
116
117
118
119
120
121
122
123
124
125
126
127
128
129
130
131
132
133
134
135
136
137
138
139
140
141
142
143
144
145
146
147
148
| void TemplateTable::getfield_or_static(int byte_no, bool is_static, RewriteControl rc) {
transition(vtos, vtos);
const Register cache = rcx;
const Register index = rdx;
const Register obj = c_rarg3;
const Register off = rbx;
const Register flags = rax;
const Register bc = c_rarg3;
resolve_cache_and_index(byte_no, cache, index, sizeof(u2));
jvmti_post_field_access(cache, index, is_static, false);
load_field_cp_cache_entry(obj, cache, index, off, flags, is_static);
if (!is_static) {
pop_and_check_object(obj);
}
const Address field(obj, off, Address::times_1);
Label Done, notByte, notBool, notInt, notShort, notChar,
notLong, notFloat, notObj, notDouble;
__ shrl(flags, ConstantPoolCacheEntry::tos_state_shift);
assert(btos == 0, "change code, btos != 0");
__ andl(flags, ConstantPoolCacheEntry::tos_state_mask);
__ jcc(Assembler::notZero, notByte);
__ load_signed_byte(rax, field);
__ push(btos);
if (!is_static) {
patch_bytecode(Bytecodes::_fast_bgetfield, bc, rbx);
}
__ jmp(Done);
__ bind(notByte);
__ cmpl(flags, ztos);
__ jcc(Assembler::notEqual, notBool);
__ load_signed_byte(rax, field);
__ push(ztos);
if (!is_static) {
patch_bytecode(Bytecodes::_fast_bgetfield, bc, rbx);
}
__ jmp(Done);
__ bind(notBool);
__ cmpl(flags, atos);
__ jcc(Assembler::notEqual, notObj);
__ load_heap_oop(rax, field);
__ push(atos);
if (!is_static) {
patch_bytecode(Bytecodes::_fast_agetfield, bc, rbx);
}
__ jmp(Done);
__ bind(notObj);
__ cmpl(flags, itos);
__ jcc(Assembler::notEqual, notInt);
__ movl(rax, field);
__ push(itos);
if (!is_static) {
patch_bytecode(Bytecodes::_fast_igetfield, bc, rbx);
}
__ jmp(Done);
__ bind(notInt);
__ cmpl(flags, ctos);
__ jcc(Assembler::notEqual, notChar);
__ load_unsigned_short(rax, field);
__ push(ctos);
if (!is_static) {
patch_bytecode(Bytecodes::_fast_cgetfield, bc, rbx);
}
__ jmp(Done);
__ bind(notChar);
__ cmpl(flags, stos);
__ jcc(Assembler::notEqual, notShort);
__ load_signed_short(rax, field);
__ push(stos);
if (!is_static) {
patch_bytecode(Bytecodes::_fast_sgetfield, bc, rbx);
}
__ jmp(Done);
__ bind(notShort);
__ cmpl(flags, ltos);
__ jcc(Assembler::notEqual, notLong);
__ movq(rax, field);
__ push(ltos);
if (!is_static) {
patch_bytecode(Bytecodes::_fast_lgetfield, bc, rbx);
}
__ jmp(Done);
__ bind(notLong);
__ cmpl(flags, ftos);
__ jcc(Assembler::notEqual, notFloat);
__ movflt(xmm0, field);
__ push(ftos);
if (!is_static) {
patch_bytecode(Bytecodes::_fast_fgetfield, bc, rbx);
}
__ jmp(Done);
__ bind(notFloat);
__ movdbl(xmm0, field);
__ push(dtos);
if (!is_static) {
patch_bytecode(Bytecodes::_fast_dgetfield, bc, rbx);
}
__ bind(Done);
|
这里有几个概念解释一下
_fast_bgetfield 由于JVM的模板解释器的原理很简单,将java字节码所要执行的操作以汇编代码方式(这里说汇编是针对于不同的cpu写出不同的汇编代码)然后在内存中申请一块区域,将代码(也就是二进制流)放到这块区域当中,搞一个函数指针指向这块区域,当然,在执行的时候会直接执行这块区域,那么这就需要操作系统允许应用程序开辟内存,且可以执行这块内存的代码。 所以,汇编指令在编写的时候,很关心需要操作的栈顶元素以及要操作的数据的长度,因此,有一系列的_fast_bgetfield 汇编代码模板。而getstatic / _getfield适用于所有类型的字段属性读取,因此在具体实现时需要根据flags中保存的属性类型适配对应的处理逻辑,为了避免每次都要判断属性类型。定义在hotspot/src/share/vm/interpreter/templateTable.cpp里。
1
2
3
4
5
6
7
8
9
10
11
12
13
14
15
16
17
|
def(Bytecodes::_nop , ____|____|____|____, vtos, vtos, nop , _ );
def(Bytecodes::_aconst_null , ____|____|____|____, vtos, atos, aconst_null , _ );
def(Bytecodes::_iconst_m1 , ____|____|____|____, vtos, itos, iconst , -1 );
def(Bytecodes::_fast_agetfield , ubcp|____|____|____, atos, atos, fast_accessfield , atos );
def(Bytecodes::_fast_bgetfield , ubcp|____|____|____, atos, itos, fast_accessfield , itos );
def(Bytecodes::_fast_cgetfield , ubcp|____|____|____, atos, itos, fast_accessfield , itos );
def(Bytecodes::_fast_aputfield , ubcp|____|____|____, atos, vtos, fast_storefield , atos );
def(Bytecodes::_fast_bputfield , ubcp|____|____|____, itos, vtos, fast_storefield , itos );
def(Bytecodes::_fast_cputfield , ubcp|____|____|____, itos, vtos, fast_storefield , itos );
...
|
- 就是定义一个宏,泛指字节码解释器。
#define __ masm-> 而masm 指的就是MacroAssembler 这个类(当然,我是粗略的看了一下,并没有验证,这点存疑)MacroAssembler 就是具体将模板程和JVM的一个媒介。具体如何工作,这里就不在展开。 直接放实现fast_accessfield 的实现
1
2
3
4
5
6
7
8
9
10
11
12
13
14
15
16
17
18
19
20
21
22
23
24
25
26
27
28
29
30
31
32
33
34
35
36
37
38
39
40
41
42
43
44
45
46
47
48
49
50
51
52
53
54
55
56
57
58
59
60
61
62
63
64
65
66
67
68
69
70
71
| void TemplateTable::fast_accessfield(TosState state) {
transition(atos, state);
if (JvmtiExport::can_post_field_access()) {
Label L1;
__ mov32(rcx, ExternalAddress((address) JvmtiExport::get_field_access_count_addr()));
__ testl(rcx, rcx);
__ jcc(Assembler::zero, L1);
__ get_cache_entry_pointer_at_bcp(c_rarg2, rcx, 1);
__ verify_oop(rax);
__ push_ptr(rax);
__ mov(c_rarg1, rax);
__ call_VM(noreg,
CAST_FROM_FN_PTR(address,
InterpreterRuntime::post_field_access),
c_rarg1, c_rarg2);
__ pop_ptr(rax);
__ bind(L1);
}
__ get_cache_and_index_at_bcp(rcx, rbx, 1);
__ movptr(rbx, Address(rcx, rbx, Address::times_8,
in_bytes(ConstantPoolCache::base_offset() +
ConstantPoolCacheEntry::f2_offset())));
__ verify_oop(rax);
__ null_check(rax);
Address field(rax, rbx, Address::times_1);
switch (bytecode()) {
case Bytecodes::_fast_agetfield:
__ load_heap_oop(rax, field);
__ verify_oop(rax);
break;
case Bytecodes::_fast_lgetfield:
__ movq(rax, field);
break;
case Bytecodes::_fast_igetfield:
__ movl(rax, field);
break;
case Bytecodes::_fast_bgetfield:
__ movsbl(rax, field);
break;
case Bytecodes::_fast_sgetfield:
__ load_signed_short(rax, field);
break;
case Bytecodes::_fast_cgetfield:
__ load_unsigned_short(rax, field);
break;
case Bytecodes::_fast_fgetfield:
__ movflt(xmm0, field);
break;
case Bytecodes::_fast_dgetfield:
__ movdbl(xmm0, field);
break;
default:
ShouldNotReachHere();
}
}
|
我们看到,其实在对于volatile 变量来说,在读取的时候,并没有做处理。我们在来看写操作。
写操作
_putstatic / _putfield 这两个字节码指令用于写入静态属性或者实例属性,其实现如下:
1
2
3
4
5
6
7
8
9
10
11
12
13
14
15
16
17
18
19
20
21
22
23
24
25
26
27
28
29
30
31
32
33
34
35
36
37
38
39
40
41
42
43
44
45
46
47
48
49
50
51
52
53
54
55
56
57
58
59
60
61
62
63
64
65
66
67
68
69
70
71
72
73
74
75
76
77
78
79
80
81
82
83
84
85
86
87
88
89
90
91
92
93
94
95
96
97
98
99
100
101
102
103
104
105
106
107
108
109
110
111
112
113
114
115
116
117
118
119
120
121
122
123
124
125
126
127
128
129
130
131
132
133
134
135
136
137
138
139
140
141
142
143
144
145
146
147
148
149
150
151
152
153
154
155
156
157
158
159
160
161
162
163
164
165
166
167
168
169
170
171
172
173
174
175
| void TemplateTable::putfield(int byte_no) {
putfield_or_static(byte_no, false);
}
void TemplateTable::putstatic(int byte_no) {
putfield_or_static(byte_no, true);
}
void TemplateTable::putfield_or_static(int byte_no, bool is_static) {
transition(vtos, vtos);
const Register cache = rcx;
const Register index = rdx;
const Register obj = rcx;
const Register off = rbx;
const Register flags = rax;
const Register bc = c_rarg3;
resolve_cache_and_index(byte_no, cache, index, sizeof(u2));
jvmti_post_field_mod(cache, index, is_static);
load_field_cp_cache_entry(obj, cache, index, off, flags, is_static);
Label notVolatile, Done;
__ movl(rdx, flags);
__ shrl(rdx, ConstantPoolCacheEntry::is_volatile_shift);
__ andl(rdx, 0x1);
{
__ pop(btos);
if (!is_static) pop_and_check_object(obj);
__ movb(field, rax);
if (!is_static) {
patch_bytecode(Bytecodes::_fast_bputfield, bc, rbx, true, byte_no);
}
__ jmp(Done);
}
__ bind(notByte);
__ cmpl(flags, ztos);
__ jcc(Assembler::notEqual, notBool);
{
__ pop(ztos);
if (!is_static) pop_and_check_object(obj);
__ andl(rax, 0x1);
__ movb(field, rax);
if (!is_static) {
patch_bytecode(Bytecodes::_fast_zputfield, bc, rbx, true, byte_no);
}
__ jmp(Done);
}
__ bind(notBool);
__ cmpl(flags, atos);
__ jcc(Assembler::notEqual, notObj);
__ bind(notObj);
__ cmpl(flags, itos);
__ jcc(Assembler::notEqual, notInt);
{
__ pop(itos);
if (!is_static) pop_and_check_object(obj);
__ movl(field, rax);
if (!is_static) {
patch_bytecode(Bytecodes::_fast_iputfield, bc, rbx, true, byte_no);
}
__ jmp(Done);
}
__ bind(notInt);
__ cmpl(flags, ctos);
__ jcc(Assembler::notEqual, notChar);
{
__ pop(ctos);
if (!is_static) pop_and_check_object(obj);
__ movw(field, rax);
if (!is_static) {
patch_bytecode(Bytecodes::_fast_cputfield, bc, rbx, true, byte_no);
}
__ jmp(Done);
}
__ bind(notChar);
__ cmpl(flags, stos);
__ jcc(Assembler::notEqual, notShort);
{
__ pop(stos);
if (!is_static) pop_and_check_object(obj);
__ movw(field, rax);
if (!is_static) {
patch_bytecode(Bytecodes::_fast_sputfield, bc, rbx, true, byte_no);
}
__ jmp(Done);
}
__ bind(notShort);
__ cmpl(flags, ltos);
__ jcc(Assembler::notEqual, notLong);
{
__ pop(ltos);
if (!is_static) pop_and_check_object(obj);
__ movq(field, rax);
if (!is_static) {
patch_bytecode(Bytecodes::_fast_lputfield, bc, rbx, true, byte_no);
}
__ jmp(Done);
}
__ bind(notLong);
__ cmpl(flags, ftos);
__ jcc(Assembler::notEqual, notFloat);
{
__ pop(ftos);
if (!is_static) pop_and_check_object(obj);
__ movflt(field, xmm0);
if (!is_static) {
patch_bytecode(Bytecodes::_fast_fputfield, bc, rbx, true, byte_no);
}
__ jmp(Done);
}
__ bind(notFloat);
{
__ pop(dtos);
if (!is_static) pop_and_check_object(obj);
__ movdbl(field, xmm0);
if (!is_static) {
patch_bytecode(Bytecodes::_fast_dputfield, bc, rbx, true, byte_no);
}
}
__ bind(Done);
__ testl(rdx, rdx);
__ jcc(Assembler::zero, notVolatile);
volatile_barrier(Assembler::Membar_mask_bits(Assembler::StoreLoad |
Assembler::StoreStore));
__ bind(notVolatile);
}
|
同理,我们根据上面的template表,可以看到实际执行的代码段fast_storefield 如下。
1
2
3
4
5
6
7
8
9
10
11
12
13
14
15
16
17
18
19
20
21
22
23
24
25
26
27
28
29
30
31
32
33
34
35
36
37
38
39
40
41
42
43
44
45
46
47
48
49
50
51
52
53
54
55
56
57
58
59
60
61
62
63
64
65
66
67
68
69
70
71
| void TemplateTable::fast_storefield(TosState state) {
transition(state, vtos);
ByteSize base = ConstantPoolCache::base_offset();
jvmti_post_fast_field_mod();
__ get_cache_and_index_at_bcp(rcx, rbx, 1);
__ movl(rdx, Address(rcx, rbx, Address::times_8,
in_bytes(base +
ConstantPoolCacheEntry::flags_offset())));
__ movptr(rbx, Address(rcx, rbx, Address::times_8,
in_bytes(base + ConstantPoolCacheEntry::f2_offset())));
Label notVolatile;
__ shrl(rdx, ConstantPoolCacheEntry::is_volatile_shift);
__ andl(rdx, 0x1);
pop_and_check_object(rcx);
const Address field(rcx, rbx, Address::times_1);
switch (bytecode()) {
case Bytecodes::_fast_aputfield:
do_oop_store(_masm, field, rax, _bs->kind(), false);
break;
case Bytecodes::_fast_lputfield:
__ movq(field, rax);
break;
case Bytecodes::_fast_iputfield:
__ movl(field, rax);
break;
case Bytecodes::_fast_zputfield:
__ andl(rax, 0x1);
case Bytecodes::_fast_bputfield:
__ movb(field, rax);
break;
case Bytecodes::_fast_sputfield:
case Bytecodes::_fast_cputfield:
__ movw(field, rax);
break;
case Bytecodes::_fast_fputfield:
__ movflt(field, xmm0);
break;
case Bytecodes::_fast_dputfield:
__ movdbl(field, xmm0);
break;
default:
ShouldNotReachHere();
}
__ testl(rdx, rdx);
__ jcc(Assembler::zero, notVolatile);
volatile_barrier(Assembler::Membar_mask_bits(Assembler::StoreLoad |
Assembler::StoreStore));
__ bind(notVolatile);
}
|
无论是fast_storefield 还是 putfield_or_static 他们都判断了是否是volatile 变量,然后执行了 volatile_barrier 方法。
我们来看一下volatile_barrier 方法做了什么。
1
2
3
4
5
6
7
8
9
10
11
12
13
14
15
16
17
18
| void TemplateTable::volatile_barrier(Assembler::Membar_mask_bits
order_constraint) {
if (os::is_MP()) {
__ membar(order_constraint);
}
}
void membar(Membar_mask_bits order_constraint) {
if (os::is_MP()) {
if (order_constraint & StoreLoad) {
lock();
addl(Address(rsp, 0), 0);
}
}
}
|
如果是volatile变量,在属性修改完成后就会执行lock addl $0×0,(%rsp);。
所以lock指令有两个含义,1、是形成流水行内存屏障,是的流水线执行顺序执行,2、是的MESI协议中的其他cpu缓存失效,并且将值写入内存,,这样volatile 其他cpu读取的时候就会直接从内存当中加载,而不是使用自己的缓存。
CppInterpreter 解释下的
hotspot解释器模块(hotspot\src\share\vm\interpreter)有两个实现:
- C++解释器 = bytecodeInterpreter + cppInterpreter
- 模板解释器 = templateTable + templateInterpreter
模板解释器我们看完了,下面我们来看一下C++ 解释器的实现。代码位于hotspot/src/share/vm/interpreter/bytecodeInterpreter.cpp
1
2
3
4
5
6
7
8
9
10
11
12
13
14
15
16
17
18
19
20
21
22
| CASE(_getfield):
CASE(_getstatic):
{
TosState tos_type = cache->flag_state();
int field_offset = cache->f2_as_index();
if (cache->is_volatile()) {
}
}
CASE(_putfield):
CASE(_putstatic):
{
int field_offset = cache->f2_as_index();
if (cache->is_volatile()) {
OrderAccess::storeload();
} else {
|
可以看到,在执行完操作之后,bytecodeInterpreter 增加了OrderAccess::storeload() 屏障,代码如下
1
2
3
4
5
6
7
8
9
10
11
12
13
14
15
16
17
18
19
20
21
22
23
24
25
26
27
28
29
30
|
inline void OrderAccess::loadload() { acquire(); }
inline void OrderAccess::storestore() { release(); }
inline void OrderAccess::loadstore() { acquire(); }
inline void OrderAccess::storeload() { fence(); }
inline void OrderAccess::acquire() {
volatile intptr_t local_dummy;
#ifdef AMD64
__asm__ volatile ("movq 0(%%rsp), %0" : "=r" (local_dummy) : : "memory");
#else
__asm__ volatile ("movl 0(%%esp),%0" : "=r" (local_dummy) : : "memory");
#endif
}
inline void OrderAccess::release() {
volatile jint local_dummy = 0;
}
inline void OrderAccess::fence() {
if (os::is_MP()) {
#ifdef AMD64
__asm__ volatile ("lock; addl $0,0(%%rsp)" : : : "cc", "memory");
#else
__asm__ volatile ("lock; addl $0,0(%%esp)" : : : "cc", "memory");
#endif
}
}
|
注意: 在java9以后的版本当中,除了之外,都换成了 fence 方法以外,都换成了编译器屏障,如下:
1
2
3
4
5
6
7
8
9
10
11
12
13
14
15
16
17
18
19
20
21
22
23
|
static inline void compiler_barrier() {
__asm__ volatile ("" : : : "memory");
}
inline void OrderAccess::loadload() { compiler_barrier(); }
inline void OrderAccess::storestore() { compiler_barrier(); }
inline void OrderAccess::loadstore() { compiler_barrier(); }
inline void OrderAccess::storeload() { fence(); }
inline void OrderAccess::acquire() { compiler_barrier(); }
inline void OrderAccess::release() { compiler_barrier(); }
inline void OrderAccess::fence() {
if (os::is_MP()) {
#ifdef AMD64
__asm__ volatile ("lock; addl $0,0(%%rsp)" : : : "cc", "memory");
#else
__asm__ volatile ("lock; addl $0,0(%%esp)" : : : "cc", "memory");
#endif
}
compiler_barrier();
}
|
无论如何 __asm__ volatile ("" : : : "memory"); 和__asm__ volatile ("lock; addl $0,0(%%rsp)" : : : "cc", "memory") 完成的效果一样,都是禁止编译器进行优化,并且从内存取数据,而不要从寄存器取数据,如果想了解编译器优化,可以参考我的另一篇博文Java内存模型(2)编译器重排序
总结
总结一下,对于非volatile变量,虽然通过movl等指令修改了某个属性,但是这个修改只是对该CPU所属的高速缓存的修改,并没有实时写回到主内存中,在某个时机下如进程由用户态切换到内核态或者这里的执行lock指令会将对高速缓存行的修改回写到主内存中,同时通过缓存一致性协议通知其他CPU的高速缓存控制器将相关变量的高速缓存行置为无效,当其他CPU再次读取该缓存行时发现该缓存行是无效的,就会重新从主内存加载该变量到高速缓存行中,从而实现对其他CPU的可见性。
实验
你以为就完了,那就太容易,只有理论没有时间自然不能信服,下面我需要用到反汇编指令查看上述的问题。首先,我们用到的linux版本如下
1
2
| root@ubuntu:~/workplace/javalean/debug/javaclass$ uname -a
Linux ubuntu 5.4.0-73-generic
|
- 使用hsdis-amd64.so 首先你需要在网上找一个 hsdis-amd64.so 库,然后放到jdk的目录下
/jre/lib/amd66
1
2
3
4
5
6
7
8
9
10
11
| root@ubuntu:/usr/lib/jvm/java-8-openjdk-amd64/jre/lib/amd64$ ls
hsdis-amd64.so libhprof.so libjava.so libnio.so
jli libicedtea-sound.so libjawt.so libnpt.so
jvm.cfg libinstrument.so libjdwp.so libsaproc.so
jvm.cfg-default libj2gss.so libjsdt.so libsctp.so
libattach.so libj2pcsc.so libjsig.so libsplashscreen.so
libawt_headless.so libj2pkcs11.so libjsoundalsa.so libsunec.so
libawt.so libjaas_unix.so libjsound.so libunpack.so
libawt_xawt.so libjava_crw_demo.so libmanagement.so libverify.so
libdt_socket.so libjavajpeg.so libmlib_image.so libzip.so
libfontmanager.so libjavalcms.so libnet.so server
|
1
2
3
4
5
6
7
8
9
10
11
12
13
14
15
16
17
18
| public class VolatileCode {
volatile int val = 0;
int val2 = 1;
public int add(){
val++;
return val;
}
public int add2(){
val2++;
return val2;
}
public static void main(String[] args) {
VolatileCode volatileCode = new VolatileCode();
volatileCode.add();
volatileCode.add2();
}
}
|
- 编译,并加上打印参数如下
- -XX:+UnlockDiagnosticVMOptions
- -XX:PrintAssembly 打印JIT编译后的汇编
- -XX:CompileCommand=print,*MyClass.myMethod 过滤输出
过滤 add 和add2的方法,这里加上了 -Xcomp 确保是使用模板解释器来进行编译
1
| java -XX:+UnlockDiagnosticVMOptions -XX:+PrintAssembly -Xcomp -XX:CompileCommand=compileonly,*VolatileCode::add* VolatileCode
|
得到结果如下,add 方法下:
1
2
3
4
5
6
7
8
9
10
11
12
13
14
15
16
17
18
19
20
| Entry Point]
[Constants]
Entry Point]
[Constants]
# {method} {0x00007f3cd5ba83d0} 'add' '()I' in 'VolatileCode'
# [sp+0x20] (sp of caller)
0x00007f3cc110af47: mov %rbp,0x10(%rsp) ;*synchronization entry
; - VolatileCode::add@-1 (line 8)
0x00007f3cc110af4c: mov 0xc(%rsi),%r11d
0x00007f3cc110af50: inc %r11d
0x00007f3cc110af53: mov %r11d,0xc(%rsi)
0x00007f3cc110af57: lock addl $0x0,(%rsp) ;*putfield val
; - VolatileCode::add@7 (line 8)
0x00007f3cc110af5c: mov 0xc(%rsi),%eax ;*getfield val
; - VolatileCode::add@11 (line 9)
0x00007f3cc110af6a: retq
|
add2的方法:
1
2
3
4
5
6
7
8
9
10
11
12
13
14
15
16
17
18
19
20
21
22
| Entry Point]
[Constants]
# {method} {0x00007f3cd5ba8470} 'add2' '()I' in 'VolatileCode'
# [sp+0x40] (sp of caller)
0x00007f3cc110f35c: add $0x8,%edi
0x00007f3cc110f35f: mov %edi,0xdc(%rax)
0x00007f3cc110f365: movabs $0x7f3cd5ba8470,%rax ; {metadata({method} {0x00007f3cd5ba8470} 'add2' '()I' in 'VolatileCode')}
0x00007f3cc110f36f: and $0x0,%edi
0x00007f3cc110f372: cmp $0x0,%edi
0x00007f3cc110f375: je 0x00007f3cc110f38f ;*aload_0
; - VolatileCode::add2@0 (line 12)
0x00007f3cc110f37b: mov 0x10(%rsi),%eax ;*getfield val2
; - VolatileCode::add2@2 (line 12)
0x00007f3cc110f37e: inc %eax
0x00007f3cc110f380: mov %eax,0x10(%rsi) ;*putfield val2
; - VolatileCode::add2@7 (line 12)
0x00007f3cc110f38e: retq
|
对于add 和add2 来说 add 比add多了一个 lock指令。
参考