前面我们用自己的代理模式完成一些重试的操作,接下来我们将分析一下 SpringRetry 的实现方式spring-retry 项目实现了重试和熔断功能,目前已用于SpringBatch、Spring Integration等项目
详解
QuickStart
我们首先来看一下使用。
首先我们引入使用,这里我们使用的是1.3版本
1 | <!-- https://mvnrepository.com/artifact/org.springframework.retry/spring-retry --> |
1 | public class SpringRetryDemo { |
我们来看一下调用结果1
2
3
4
5
60
1
2
3
4
走recover逻辑了! 异常类是java.lang.RuntimeException 异常信息是第5次调用失败!
详解
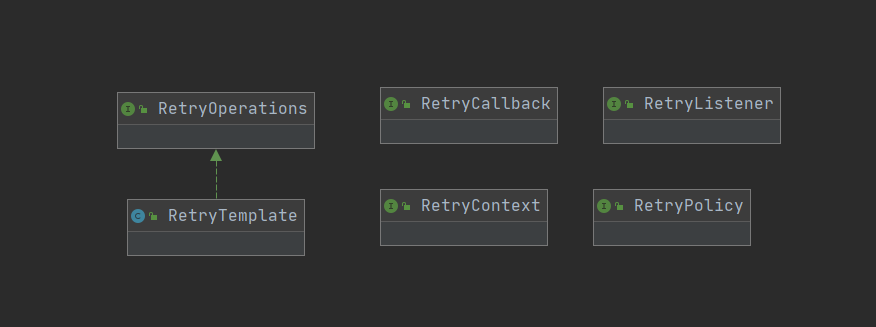
类关系
概念详解
RetryOperations 和 RetryTemplate
RetryOperations定义了重试的API,RetryTemplate提供了模板实现,线程安全的,同于Spring 一贯的API风格,RetryTemplate将重试、熔断功能封装到模板中,提供健壮和不易出错的API供大家使用。RetryCallback 和 RecoverCallback
通过RetryCallback定义需重试的业务服务,当重试超过最大重试时间或最大重试次数后可以调用RecoveryCallback进行恢复,比如返回假数据或托底数据。RetryPolicy
当抛出相关异常后执行重试策略,定义重试策略时需要定义需重试的异常(如因远程调用失败的可以重试、而因入参校对失败不应该重试)。只读操作可以重试,幂等写操作可以重试,但是非幂等写操作不能重试,重试可能导致脏写,或产生重复数据。RetryListener和RetryStatistics
RetryListener实现拦截器模式,这里主要用于统计等,当然也可以用户自定义拦截器。BackOff :补偿值,一般指失败后多久进行重试的延迟值。
Sleeper :暂停应用的工具,通常用来应用补偿值。
RetryContext :重试上下文,代表了能被重试动作使用的资源。
RetryState :重试状态,通常包含一个重试的键值。
分解详解
RetryOperations
- 首先看一下
1 | public interface RetryOperations { |
可以看出,new 出一个 RetryTemplate 对象后,核心是在 template.execute(),传递一个 RetryCallback,内部执行我们需要重试的具体方法。
这里我们看到 RetryOperations 具体定义了 execute 方法,用于去执行我们的相关逻辑。这里我们看到了有个 RetryState 对象,这里的主要是重试的状态,这个我们暂且略过,我们先来看一下重试策略
RetryPolicy
那什么时候需重试?spring-retry是当抛出相关异常后执行重试策略,定义重试策略时需要定义需重试的异常(如因远程调用失败的可以重试、而因入参校对失败不应该重试)。只读操作可以重试,幂等写操作可以重试,但是非幂等写操作不能重试,重试可能导致脏写,或产生重复数据。
接口
1
2
3
4
5
6
7
8
9
10public interface RetryPolicy extends Serializable {
//是否需要重试
boolean canRetry(RetryContext context);
// retry 生命周期函数
RetryContext open(RetryContext parent);
void close(RetryContext context);
// 记录异常
void registerThrowable(RetryContext context, Throwable throwable);
}重试接口定义了四个接口,具体的重试策略就是通过具体的实现类来完成的。
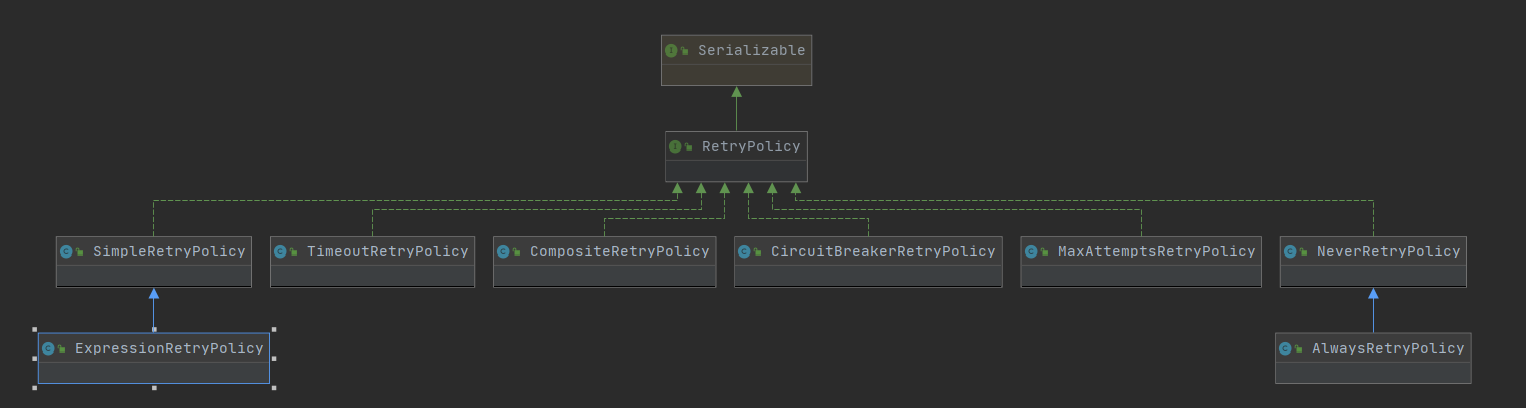
重试策略
重试策略有哪些呢?spring-retry提供了如下重试策略。
- NeverRetryPolicy :只允许调用RetryCallback一次,不允许重试;
- AlwaysRetryPolicy :允许无限重试,直到成功,此方式逻辑不当会导致死循环;
- SimpleRetryPolicy :固定次数重试策略,默认重试最大次数为3次,RetryTemplate默认使用的策略;
- TimeoutRetryPolicy :超时时间重试策略,默认超时时间为1秒,在指定的超时时间内允许重试;
- MaxAttemptsRetryPolicy: 简单重试策略,仅通过重试次数判断是否能够重试,不推荐使用。
- CircuitBreakerRetryPolicy :有熔断功能的重试策略,需设置3个参数openTimeout、resetTimeout和delegate,稍后详细介绍该策略;
- CompositeRetryPolicy :组合重试策略,有两种组合方式,乐观组合重试策略是指只要有一个策略允许重试即可以,悲观组合重试策略是指只要有一个策略不允许重试即可以,但不管哪种组合方式,组合中的每一个策略都会执行。
接下来我们分析一下SimpleRetryPolicy 类的基本实现。
- 构造函数
1
2
3
4
5
6
7
8
9
10
11
12
13
14
15// 常量,重试次数
public final static int DEFAULT_MAX_ATTEMPTS = 3;
// 实际重试次数
private volatile int maxAttempts;
// 错误分类器 classify包作为retry的辅助类,主要应用于RetryPolicy的canRetry()方法中,通过比较捕获的异常与定义的异常直接关系,决定是否符合重试条件
private BinaryExceptionClassifier retryableClassifier = new BinaryExceptionClassifier(false);
public SimpleRetryPolicy(int maxAttempts, Map<Class<? extends Throwable>, Boolean> retryableExceptions,
boolean traverseCauses, boolean defaultValue) {
super();
this.maxAttempts = maxAttempts;
this.retryableClassifier = new BinaryExceptionClassifier(retryableExceptions, defaultValue);
this.retryableClassifier.setTraverseCauses(traverseCauses);
}
这里简单介绍一下 retryableClassifier 这个成员classify 包作为retry的辅助类,主要应用于 RetryPolicy 的 canRetry() 方法中,通过比较捕获的异常与定义的异常直接关系,决定是否符合重试条件,现在只要知道他是 用于分类的就好了。
- 函数实现
- canRetry这里我们看看出,当异常使我们需要重试的异常且次数小于制定重试次数的时候,进行重试。
1
2
3
4
5
6
7
8public boolean canRetry(RetryContext context) {
Throwable t = context.getLastThrowable();
return (t == null || retryForException(t)) && context.getRetryCount() < this.maxAttempts;
}
// 用于识别 这个异常时时我们需要的异常
private boolean retryForException(Throwable ex) {
return this.retryableClassifier.classify(ex);
}getLastThrowable是重试上下文中捕获的最后的异常类型 - openopen 这个方法用于协调资源,是重试一开始的时候会被主流程调用,这里主要是new了一个
1
2
3public RetryContext open(RetryContext parent) {
return new SimpleRetryContext(parent);
}SimpleRetryContext上下文。 所以我们如果想继续了解 这个重试策略,就要简单了解一下RetryContext上下文了。
- SimpleRetryContext
我们首先来看一下SimpleRetryContext这个类的定义
1 | private static class SimpleRetryContext extends RetryContextSupport { |
一个SimpleRetryContext 紧紧就是一个 RetryContextSupport 实现。我们再来看这个类1
2
3
4
5
6
7
8
9
10
11
12
13
14
15
16
17
18public class RetryContextSupport extends AttributeAccessorSupport implements RetryContext {
private final RetryContext parent;
private volatile boolean terminate = false;
private volatile int count;
private volatile Throwable lastException;
public RetryContextSupport(RetryContext parent) {
super();
this.parent = parent;
}
//... 一些 getset 方法
// 用于记录异常
public void registerThrowable(Throwable throwable) {
this.lastException = throwable;
if (throwable != null)
count++;
}
}
AttributeAccessorSupport就是一个属性类,让继承他的类可以实现增加属性。RetryContext定义一些状态和属性以及AttributeAccessorSupport实现的接口方法。具体的代码不贴了,想了解的可以去翻阅源码。
- 异常记录
SimpleRetryPolicy 的异常注册其实是注册到了context中。当我们捕获了异常,就会将异常封装到这个上下文中。1
2
3
4
5
6//SimpleRetryPolicy.java
public void registerThrowable(RetryContext context, Throwable throwable) {
SimpleRetryContext simpleContext = ((SimpleRetryContext) context);
simpleContext.registerThrowable(throwable);
}RetryTemplate
到此基本的概念就讲完了。接下来先看下RetryTemplate主要流程实现:

我来看一下几个关键的成员变量
成员变量
1
2
3
4
5
6
7
8
9
10
11private static final String GLOBAL_STATE = "state.global";
// 回退策略
private volatile BackOffPolicy backOffPolicy = new NoBackOffPolicy();
// 重试策略
private volatile RetryPolicy retryPolicy = new SimpleRetryPolicy(3);
// 重试的监听器
private volatile RetryListener[] listeners = new RetryListener[0];
// 重试上下文
private RetryContextCache retryContextCache = new MapRetryContextCache();
// ?
private boolean throwLastExceptionOnExhausted;核心方法
1
2
3
4
5
6
7
8
9
10
11
12
13
14
15
16
17
18
19
20
21
22
23
24
25
26
27
28
29
30
31
32
33
34
35
36
37
38
39
40
41
42
43
44
45
46
47
48
49
50
51
52
53
54
55
56
57
58
59
60
61
62
63
64
65
66
67
68
69
70
71
72
73
74
75
76
77
78
79
80
81
82
83
84
85
86protected <T, E extends Throwable> T doExecute(RetryCallback<T, E> retryCallback,RecoveryCallback<T> recoveryCallback, RetryState state)
throws E, ExhaustedRetryException {
//重试策略
RetryPolicy retryPolicy = this.retryPolicy;
//退避策略
BackOffPolicy backOffPolicy = this.backOffPolicy;
//重试上下文,当前重试次数等都记录在上下文中
RetryContext context = open(retryPolicy, state);
// 同步管理器注册context 用于将context链接成一个context链儿
RetrySynchronizationManager.register(context);
boolean exhausted = false;
try {
//拦截器模式,执行RetryListener#open
boolean running = doOpenInterceptors(retryCallback, context);
// .... running 必须问true 否则 抛出异常,代码略
// Get or Start the backoff context...
BackOffContext backOffContext = null;
Object resource = context.getAttribute("backOffContext");
if (resource instanceof BackOffContext) {
backOffContext = (BackOffContext) resource;
}
if (backOffContext == null) {
backOffContext = backOffPolicy.start(context);
if (backOffContext != null) {
context.setAttribute("backOffContext", backOffContext);
}
}
//判断是否可以重试执行
while (canRetry(retryPolicy, context) && !context.isExhaustedOnly()) {
try {
//执行RetryCallback回调
lastException = null;
return retryCallback.doWithRetry(context);
} catch (Throwable e) {
// 记录异常
lastException = e;
//异常时,要进行下一次重试准备
//遇到异常后,注册该异常的失败次数
registerThrowable(retryPolicy, state, context, e);
//执行RetryListener#onError
doOnErrorInterceptors(retryCallback, context, e);
//如果可以重试,执行退避算法,比如休眠一小段时间后再重试
if (canRetry(retryPolicy, context) && !context.isExhaustedOnly()) {
try {
backOffPolicy.backOff(backOffContext);
}
catch (BackOffInterruptedException ex) {
lastException = e;
throw ex;
}
}
//state != null && state.rollbackFor(context.getLastThrowable())
//在有状态重试时,如果是需要执行回滚操作的异常,则立即抛出异常
if (shouldRethrow(retryPolicy, context, state)) {
throw RetryTemplate.<E>wrapIfNecessary(e);
}
}
//如果是有状态重试,且有GLOBAL_STATE属性,则立即跳出重试终止;当抛出的异常是非需要执行回滚操作的异常时,才会执行到此处,CircuitBreakerRetryPolicy会在此跳出循环;
if (state != null && context.hasAttribute(GLOBAL_STATE)) {
break;
}
}
exhausted = true;
//重试失败后,如果有RecoveryCallback,则执行此回调,否则抛出异常
return handleRetryExhausted(recoveryCallback, context, state);
} catch (Throwable e) {
throw RetryTemplate.<E>wrapIfNecessary(e);
} finally {
//清理环境
close(retryPolicy, context, state, lastException == null || exhausted);
//执行RetryListener#close,比如统计重试信息
doCloseInterceptors(retryCallback, context, lastException);
//RetrySynchronizationManager 清空
RetrySynchronizationManager.clear();
}
}
看到上述代码,感觉很头疼,我们来提几个问题。
MapRetryContextCache是干啥用的?RetryContext context = open(retryPolicy, state)中open 方法和state是什么;RetrySynchronizationManager.register(context); 为什么要注册这个?BackOffContext是干什么用的状态重试和回滚操作是什么意思?
接下来我们来逐一分解这些流程。
有状态or无状态
无状态重试,是在一个循环中执行完重试策略,即重试上下文保持在一个线程上下文中,在一次调用中进行完整的重试策略判断。非常简单的情况,如远程调用某个查询方法时是最常见的无状态重试。
有状态重试,有两种情况需要使用有状态重试,事务操作需要回滚或者熔断器模式。事务操作需要回滚场景时,当整个操作中抛出的是数据库异常 DataAccessException,则不能进行重试需要回滚,而抛出其他异常则可以进行重试,可以通过
RetryState实现:
我们来具体看一下 RetryState 的代码1
2
3
4
5
6
7
8public interface RetryState {
//状态缓存使用的key
Object getKey();
// 强制刷新状态
boolean isForceRefresh();
//判定当前的异常是否需要回归,默认是true.
boolean rollbackFor(Throwable exception);
}
在最简单的情况下,重试只是一个while循环,RetryTemplate 可以一直尝试,直到成功或失败。RetryContext包含一些状态来决定是重试还是中止,但是这个状态位于堆栈上,不需要将它存储在全局的任何位置,因此我们将此称为无状态重试。无状态重试和有状态重试之间的区别包含在RetryPolicy的实现中(RetryTemplate可以同时处理这两种情况),在无状态重试中,回调总是在重试失败时在同一个线程中执行。
当我出现数据库事务性的失败的时候,我们需要回滚,这样我们会在整个 template 中加上try catch 代码块。
1 | //当前状态的名称,当把状态放入缓存时,通过该key查询获取 |
在这些情况下,无状态重试是不够的,因为重新抛出和回滚必然会离开RetryOperations.execute()方法,并可能丢失堆栈上的上下文。
为了避免丢失它,我们必须引入一种存储策略,将它从堆栈中取出并(至少)放入堆存储中,为此,Spring Retry提供了一种存储策略 RetryContextCache,可以将其注入 RetryTemplate 。RetryContextCache 的默认实现在内存中,使用一个简单的Map,它有一个严格执行的最大容量,以避免内存泄漏,但它没有任何高级缓存功能,如生存时间。如果需要,应该考虑注入具有这些特性的Map,在集群环境中对多个进程的高级使用可能还会考虑使用某种集群缓存实现RetryContextCache(不过,即使在集群环境中,这也可能是多余的)。
RetryOperations 的部分职责是在失败的操作在新执行中返回时识别它们(通常封装在新事务中),为了促进这一点,Spring Retry提供了 RetryState 抽象,这与 RetryOperations 中的特殊 execute 方法一起工作。识别失败操作的方法是跨重试的多个调用标识状态,要标识状态,用户可以提供 RetryState 对象,该对象负责返回标识该项的唯一键,标识符用作RetryContextCache 中的键。
了解这个之后,我们可以来分析解决了 RetryState 的问题,我们来分析一下open 方法1
2
3
4
5
6
7
8
9
10
11
12
13
14
15
16
17
18
19
20
21
22
23
24
25
26
27
28
29
30
31
32
33
34protected RetryContext open(RetryPolicy retryPolicy, RetryState state) {
if (state == null) {
return doOpenInternal(retryPolicy);
}
Object key = state.getKey();
if (state.isForceRefresh()) {
return doOpenInternal(retryPolicy, state);
}
// If there is no cache hit we can avoid the possible expense of the
// cache re-hydration.
if (!this.retryContextCache.containsKey(key)) {
// The cache is only used if there is a failure.
return doOpenInternal(retryPolicy, state);
}
RetryContext context = this.retryContextCache.get(key);
if (context == null) {
if (this.retryContextCache.containsKey(key)) {
throw new RetryException("Inconsistent state for failed item: no history found. "
+ "Consider whether equals() or hashCode() for the item might be inconsistent, "
+ "or if you need to supply a better ItemKeyGenerator");
}
// The cache could have been expired in between calls to
// containsKey(), so we have to live with this:
return doOpenInternal(retryPolicy, state);
}
// Start with a clean slate for state that others may be inspecting
context.removeAttribute(RetryContext.CLOSED);
context.removeAttribute(RetryContext.EXHAUSTED);
context.removeAttribute(RetryContext.RECOVERED);
return context;
}
由上面代码我们可以了解到, 当 state 为空的时候,证明是无状态重试,那么在exectue的时候,优先执行open方法,open 方法又去执行了 doOpenInternal1
2
3
4
5
6
7
8
9
10private RetryContext doOpenInternal(RetryPolicy retryPolicy, RetryState state) {
RetryContext context = retryPolicy.open(RetrySynchronizationManager.getContext());
if (state != null) {
context.setAttribute(RetryContext.STATE_KEY, state.getKey());
}
if (context.hasAttribute(GLOBAL_STATE)) {
registerContext(context, state);
}
return context;
}doOpenInternal 方法是调用的 policy 的 open 方法,也就是 simplePolicy 的open 方法,simplepolicy 的方法就是创建一个 context。 另外在创建的 时候传入了一个父类 context
那么 RetrySynchronizationManager 是在什么时候注册的呢?
实在从上面的代码看到,是在 open 方法结束之后,注册的,也就是说,如果同一个线程可如果多次重试,那么 context 是会保留的下来的,是一个链式结构。
在多个Context 之间可以共享 state 而这个 state 可以放到外边,多个template 可以共享一个state
当我们的 state 状态设置成 不强制刷新,则会从 this.retryContextCache 中去寻找相关key对应的context用来复用,这样一来就实现了 多个context 共享一个 state.
回退策略
重试时的退避策略是什么?是立即重试还是等待一段时间后重试,比如是网络错误,立即重试将导致立即失败,最好等待一小段时间后重试,还要防止很多服务同时重试导致DDos。

NoBackOffPolicy :无退避算法策略,即当重试时是立即重试;
FixedBackOffPolicy :固定时间的退避策略,需设置参数sleeper和backOffPeriod,sleeper指定等待策略,默认是Thread.sleep,即线程休眠,backOffPeriod指定休眠时间,默认1秒;
UniformRandomBackOffPolicy :随机时间退避策略,需设置sleeper、minBackOffPeriod和maxBackOffPeriod,该策略在[minBackOffPeriod,maxBackOffPeriod之间取一个随机休眠时间,minBackOffPeriod默认500毫秒,maxBackOffPeriod默认1500毫秒;
ExponentialBackOffPolicy :指数退避策略,需设置参数
sleeper、initialInterval、maxInterval和multiplier,initialInterval指定初始休眠时间,默认100毫秒,maxInterval指定最大休眠时间,默认30秒,multiplier指定乘数,即下一次休眠时间为当前休眠时间*multiplier;ExponentialRandomBackOffPolicy :随机指数退避策略,引入随机乘数,之前说过固定乘数可能会引起很多服务同时重试导致DDos,使用随机休眠时间来避免这种情况。
1 | package org.springframework.retry.backoff; |
我们来看一下使用1
2
3
4
5
6
7
8
9
10
11
12
13
14RetryTemplate template = new RetryTemplate();
//重试策略:次数重试策略
RetryPolicy retryPolicy = new SimpleRetryPolicy(3);
template.setRetryPolicy(retryPolicy);
//退避策略:固定时间退避策略
FixedBackOffPolicy backOffPolicy = new FixedBackOffPolicy();
// 每次重试间隔5000
backOffPolicy.setBackOffPeriod(5000);
template.setBackOffPolicy(backOffPolicy);
String result = template.execute(context -> {
System.out.println("retry count:" + context.getRetryCount());
throw new RuntimeException("timeout");
});
我们继承图可以看到,固定时间的退避策略继承了 StatelessBackOffPolicy 无状态的退避策略,无状态的退避策略的start 方法 返回null
从template 的流程中看到,退避策略一旦出了问题,会直接抛出异常,中断重试。
1 | // StatelessBackOffPolicy.java |
熔断策略
熔断策略解决的是 当我们随意组合了重试策略,比如说一直重试的时候,保护系统的一种机制,可以根据重试时间来中断重拾,这种中断方式会根据实际请求的来动态调整,我们来看使用1
2
3
4
5
6
7
8
9
10
11
12
13
14
15
16
17
18
19
20
21
22
23
24
25
26
27
28
29
30
31
32RetryTemplate template = new RetryTemplate();
CircuitBreakerRetryPolicy retryPolicy =
// 这里使用了 一直重试
new CircuitBreakerRetryPolicy(new AlwaysRetryPolicy());
// 超时时间5s
retryPolicy.setOpenTimeout(5000);
retryPolicy.setResetTimeout(5000);
template.setRetryPolicy(retryPolicy);
for (int i = 0; i < 10; i++) {
try {
Object key = "circuit";
boolean isForceRefresh = false;
RetryState state = new DefaultRetryState(key, isForceRefresh);
String result = template.execute(new RetryCallback<String, RuntimeException>() {
public String doWithRetry(RetryContext context) throws RuntimeException {
System.out.println("retry count:" + context.getRetryCount());
throw new RuntimeException("timeout");
}
}, new RecoveryCallback<String>() {
public String recover(RetryContext context) throws Exception {
return "default";
}
}, state);
System.out.println(result);
} catch (Exception e) {
System.out.println(e);
}
}
为什么说是全局模式呢?我们配置了isForceRefresh为false,则在获取上下文时是根据key “circuit”从缓存中获取,从而拿到同一个上下文。
1 | Object key = "circuit"; |
熔断器策略配置代码,CircuitBreakerRetryPolicy 需要配置三个参数:
delegate:是真正判断是否重试的策略,当重试失败时,则执行熔断策略;openTimeout:openWindow,配置熔断器电路打开的超时时间,当超过openTimeout之后熔断器电路变成半打开状态(主要有一次重试成功,则闭合电路);resetTimeout:timeout,配置重置熔断器重新闭合的超时时间。
断熔断器电路是否打开的代码:
1 | public boolean isOpen() { |
从如上代码可看出spring-retry的熔断策略相对简单:
- 当重试失败,且在熔断器打开时间窗口[0,openWindow) 内,立即熔断;
- 当重试失败,且在指定超时时间后(>timeout),熔断器电路重新闭合;
- 在熔断器半打开状态[openWindow, timeout] 时,只要重试成功则重置上下文,断路器闭合。
总结
从template 的流程我们可以看出spring 工程师的设计思想。
1、 核心是一个 while(retry) {} 的循环
2、 增加了 listener 等监听机制
3、 在 retry 的前后加入了 接口用来实现不同的重试策略
4、 在不同的重试策略中,加入了重试的退避策略
5、 在不同的策略中和重试主流程中加入了 status 状态用于共享数据。
我们根据这些机制的不断组合,可以实现更多的重试机制。 核心代码不是很多,也很好理解。
参考
赞赏一下